
https://www.facebook.com/profile.php?id=100001136506311&epa=SEARCH_BOX

https://www.facebook.com/branislava.jankovic.1
https://www.facebook.com/petar.jankovic.sergeant.cross
Almost daily the food on our table is different to what we would want it to be. Instead of succulent fruit and vegetables we have plastic tomatoes, watery cucumbers and sour apricots. To solve this problem people look to a couple of different solutions. Some invest in building vertical farms that would create the right conditions for growing a large number of different kinds of produce while some people try to grow their favorites in their homes, gardens and balconies. As the number of people inhabiting the planet steadily rises, just as the amount of free space shrinks, today’s solutions are becoming less suitable and alternatives must be found. Our new solution needs to take up little place, guarantee good conditions for raising any crops, as well be close enough to the consumer to minimize packaging and transport costs, as well as prevent spoilage and damage to the produce itself. Keeping these requirements in mind we have come up with the idea to create a network of smart greenhouses connected to a service tasked with controlling the operations of all our greenhouses and making sure they have everything they need. This is how we came to design and plan our first greenhouse, which graciously bore the name of Penelope.
Project Penelope was started in April, 2019, in the Teaching and Research Laboratory of Basic Physics and Technologies of Wireless Communication, at the Lobachevsky State University of Nizhni Novgorod. The participants of the project in question are Branislava Yankovich, a first-year student at the Faculty of Radiophysics at the Lobachevsky State University of Nizhni Novgorod, Petar Yankovich, a third-year student at the Faculty of Chemistry at the Lobachevsky State University, and acting as mentors and advisors were associate professor and director of the Research Laboratory of Basic Physics and Technologies of Wireless Communication Aleksej Lvovich Umnov from the department of Electrodynamics at the Faculty of Radiophysics, and Denis Andrejevich Bespalov, who is employed at the same research laboratory. The division of work is explained further in the text.
| Foto | Name | Biography | Social Media |
|
Aleksey Umnov |
https://www.facebook.com/profile.php?id=100001136506311&epa=SEARCH_BOX |
|
| Denis Bespalov | master1312@yandex.ru | ||
|
Branislava Yankovich |
https://www.facebook.com/branislava.jankovic.1 |
|
| Petar Yankovich |
https://www.facebook.com/petar.jankovic.sergeant.cross |
| OBLIGATIONS | WHO FILLS | EXPECTED END | RESULT |
| make a plan of greenhouses and draw schemes | Branislava | 10.04.2019. | done |
| create a document about the Penelopa project |
Branislava |
- | |
| advertise project | Branislava | - | |
| complete calculations related to CO2 and write the theoretical part | Petar | 14.04.2019. | done |
| purchase of equipment |
Branislava |
14.04.2019. |
partially |
| installation of greenhouses |
Branislava |
15-21.04.2019 | partially |
| program part |
Branislava |
22.04-05.05.2019. | partially |
| conducting experiments |
Branislava, Petar |
06-12.05.2019. | |
| preparation for 16.05.2019. |
Branislava, Petar |
12-16.05.2019. | done |
Mentors and students communicated via a dialogue which is a part of an application called Ecoimpact. An example of one such dialogue can be seen in the image below.

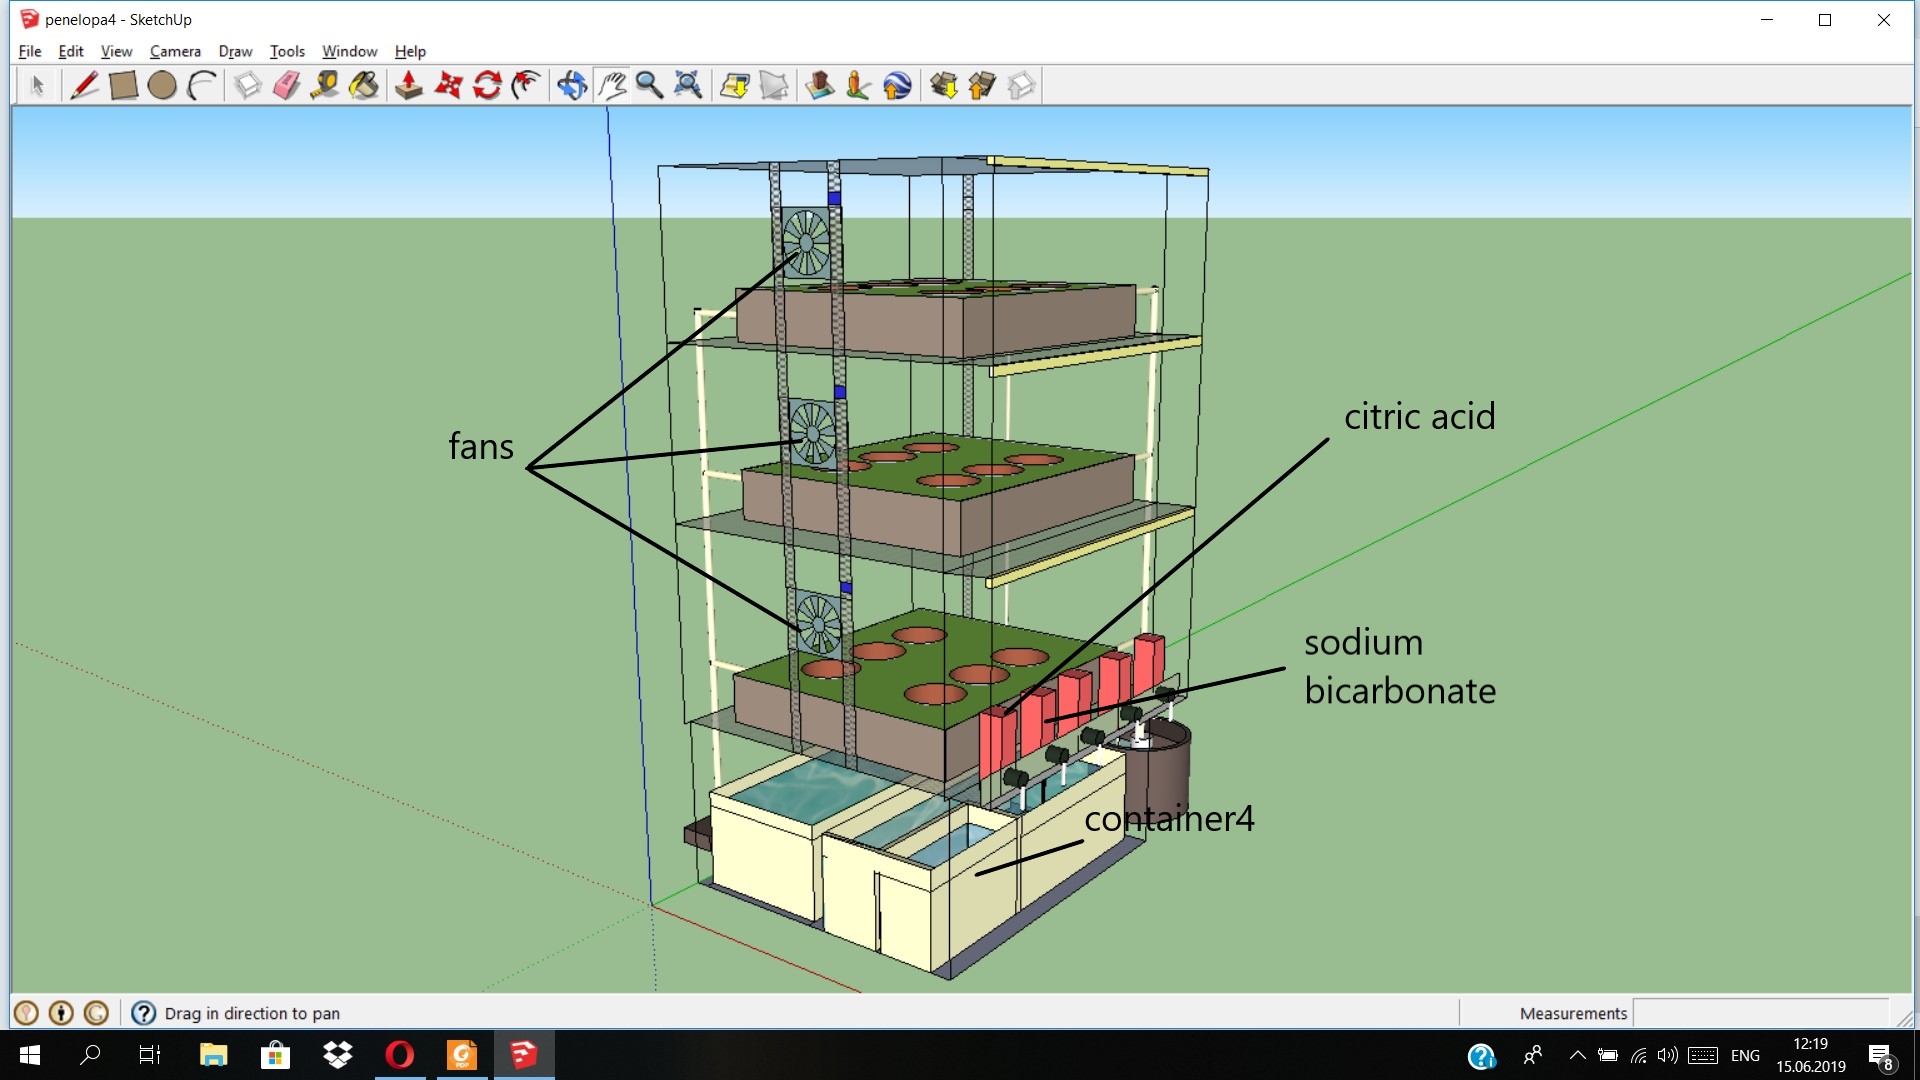
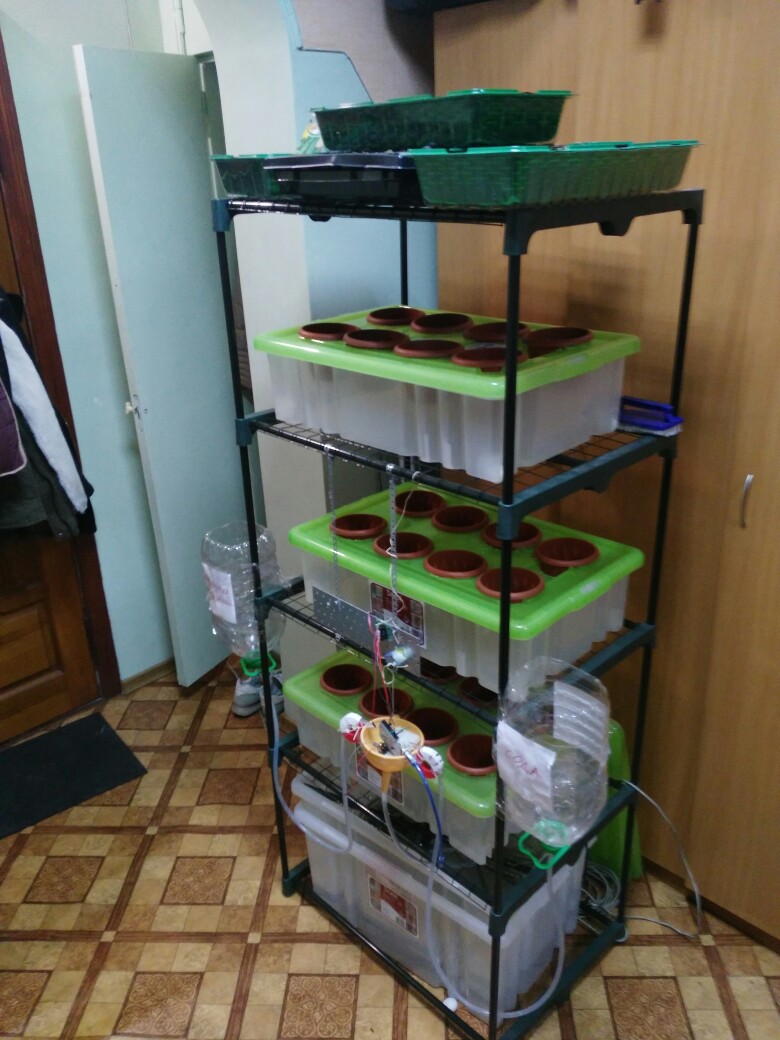
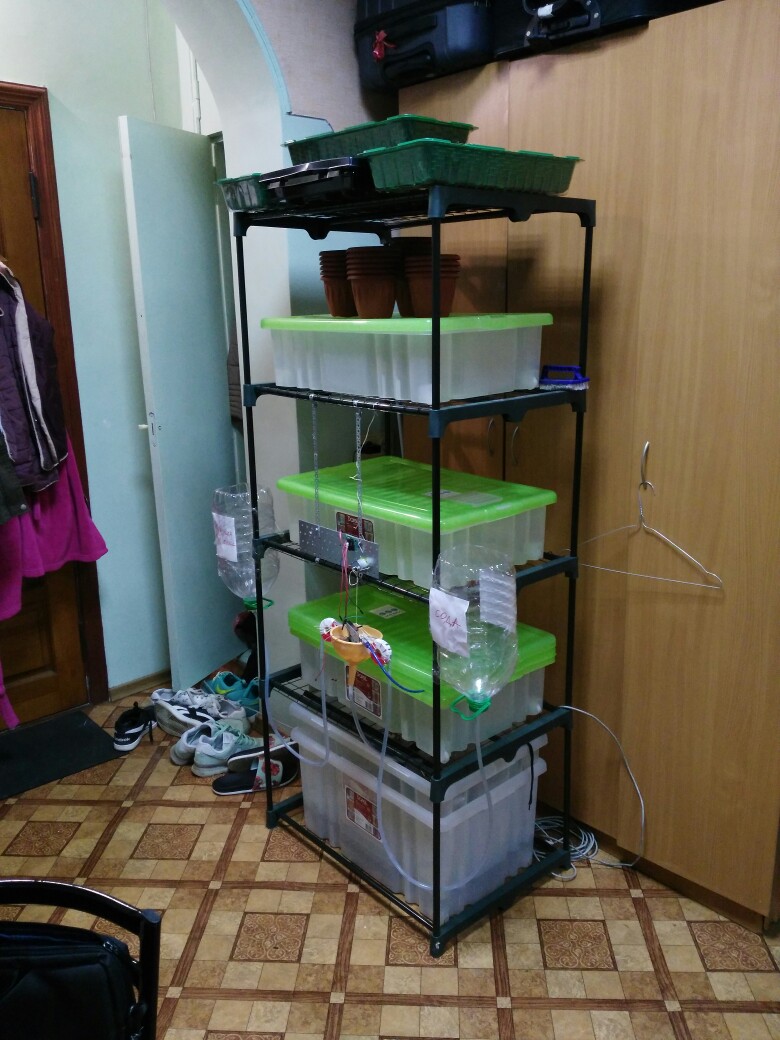
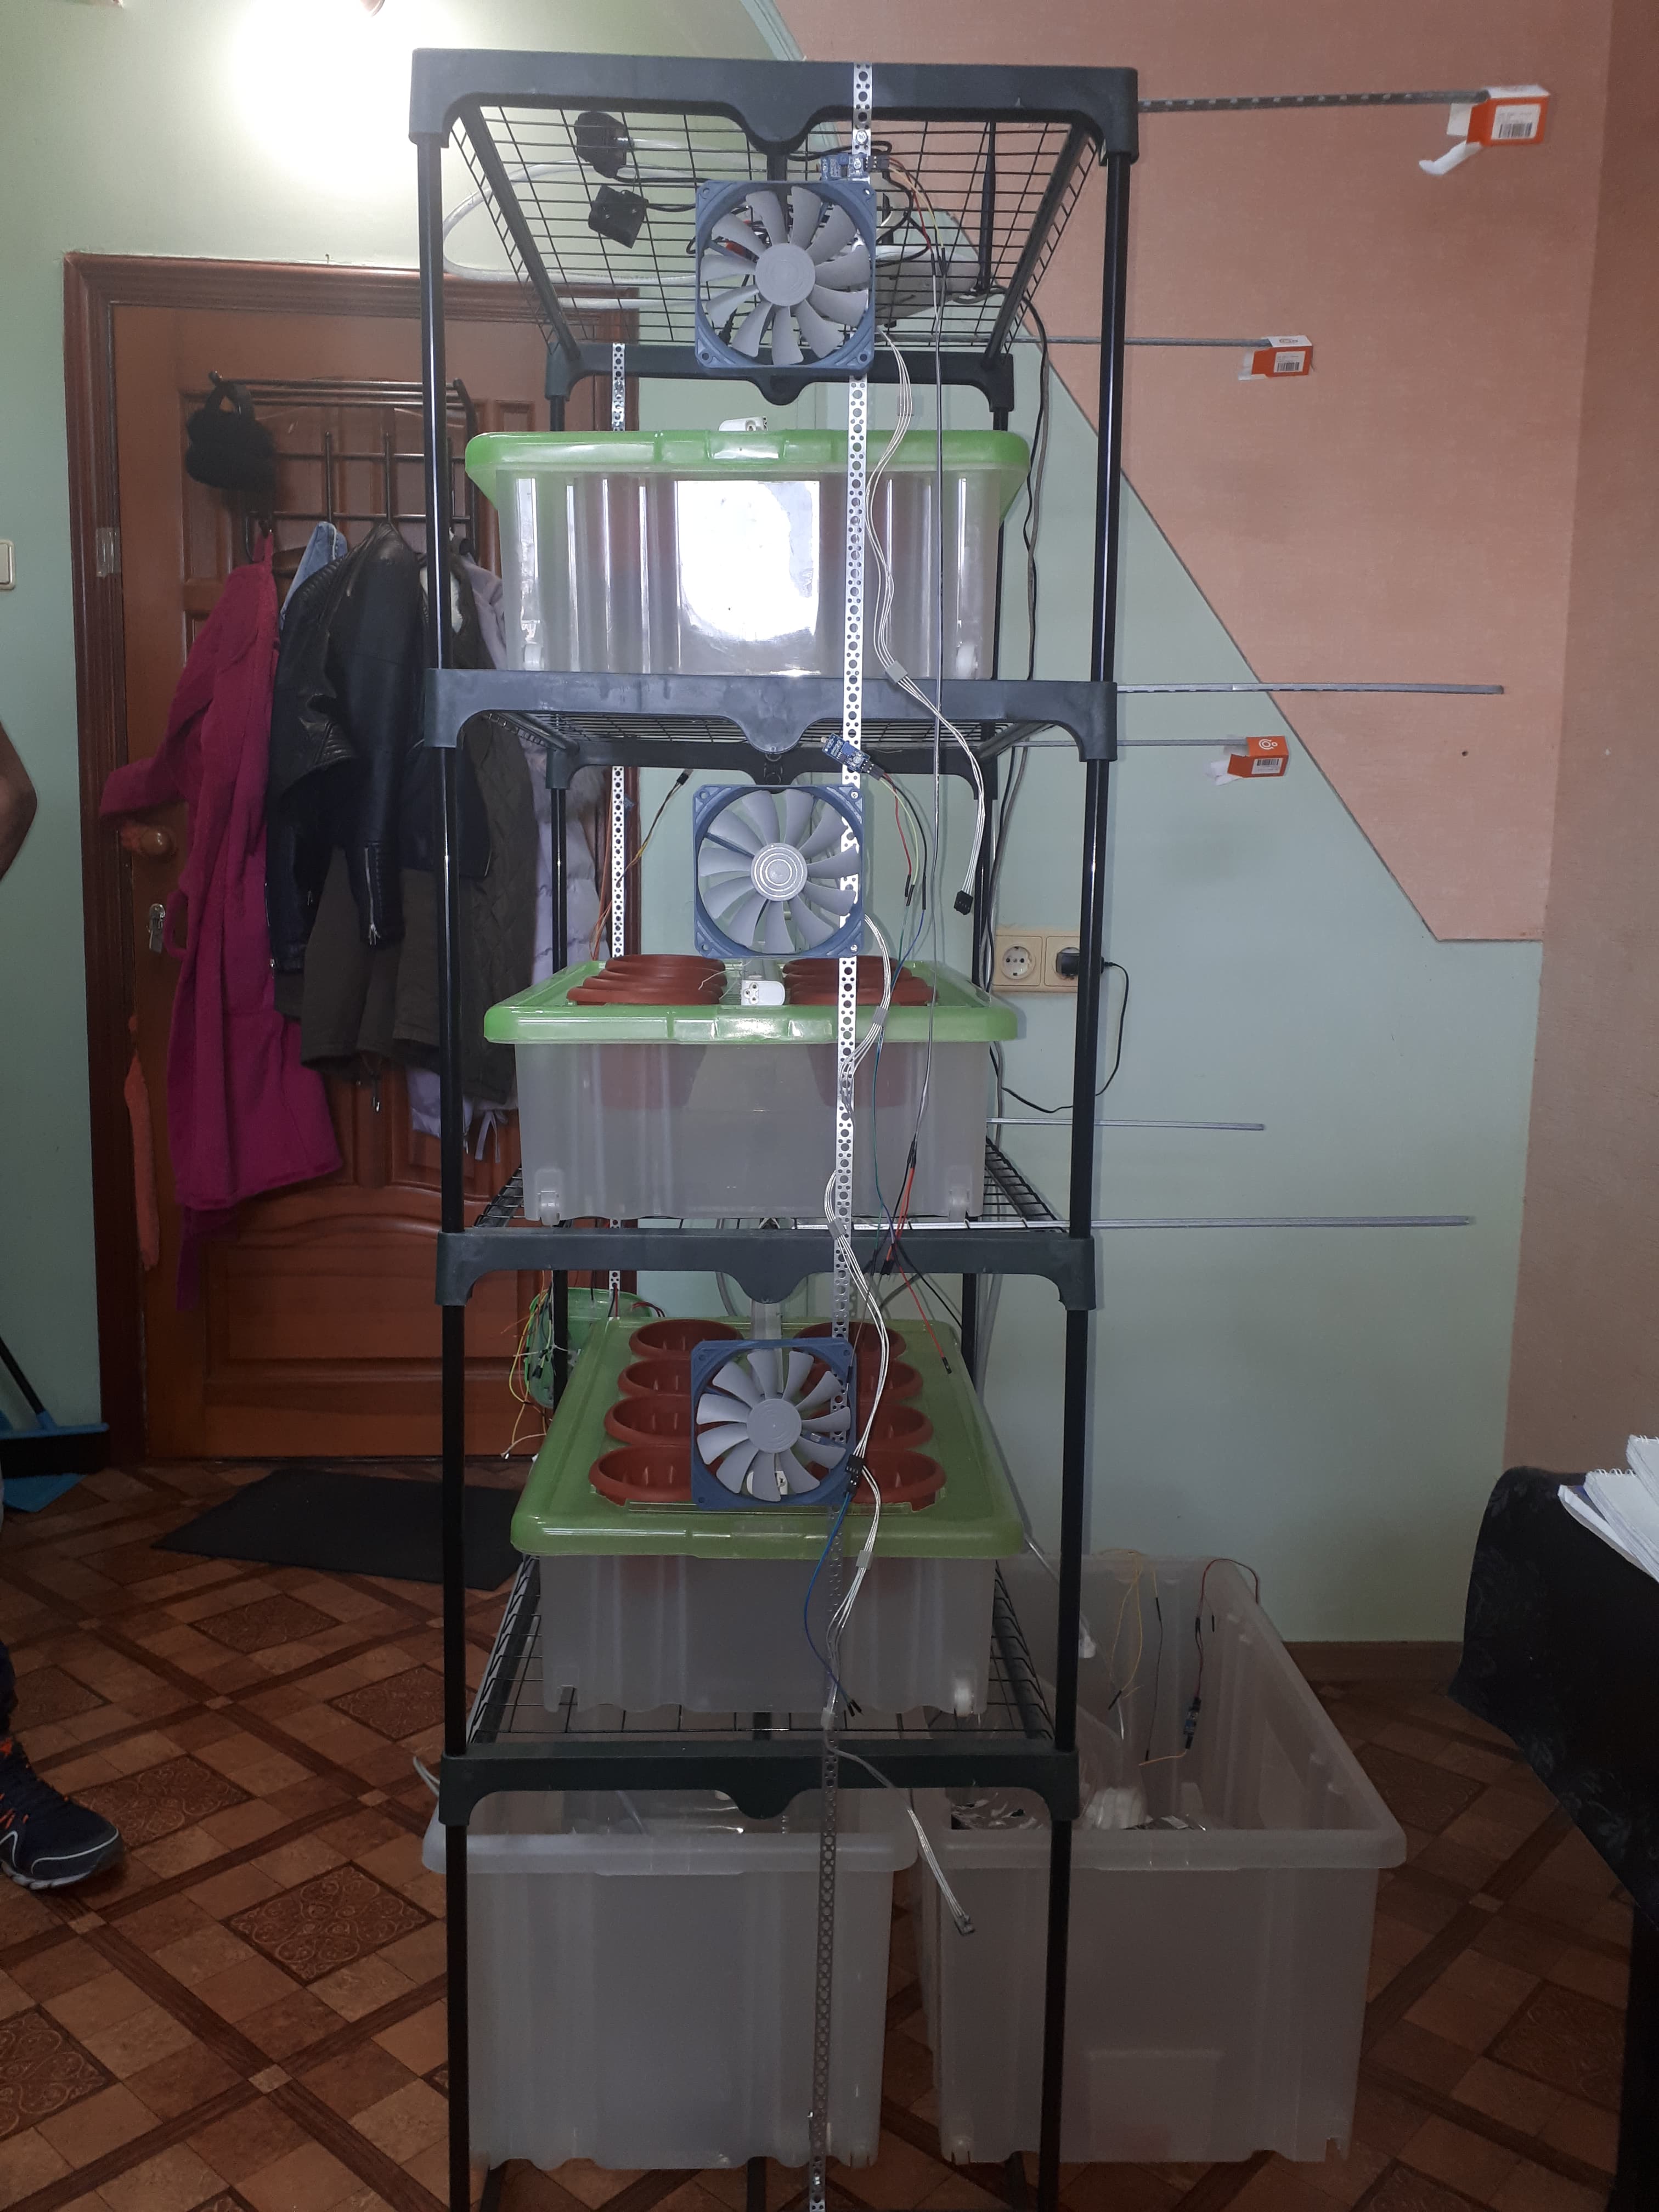
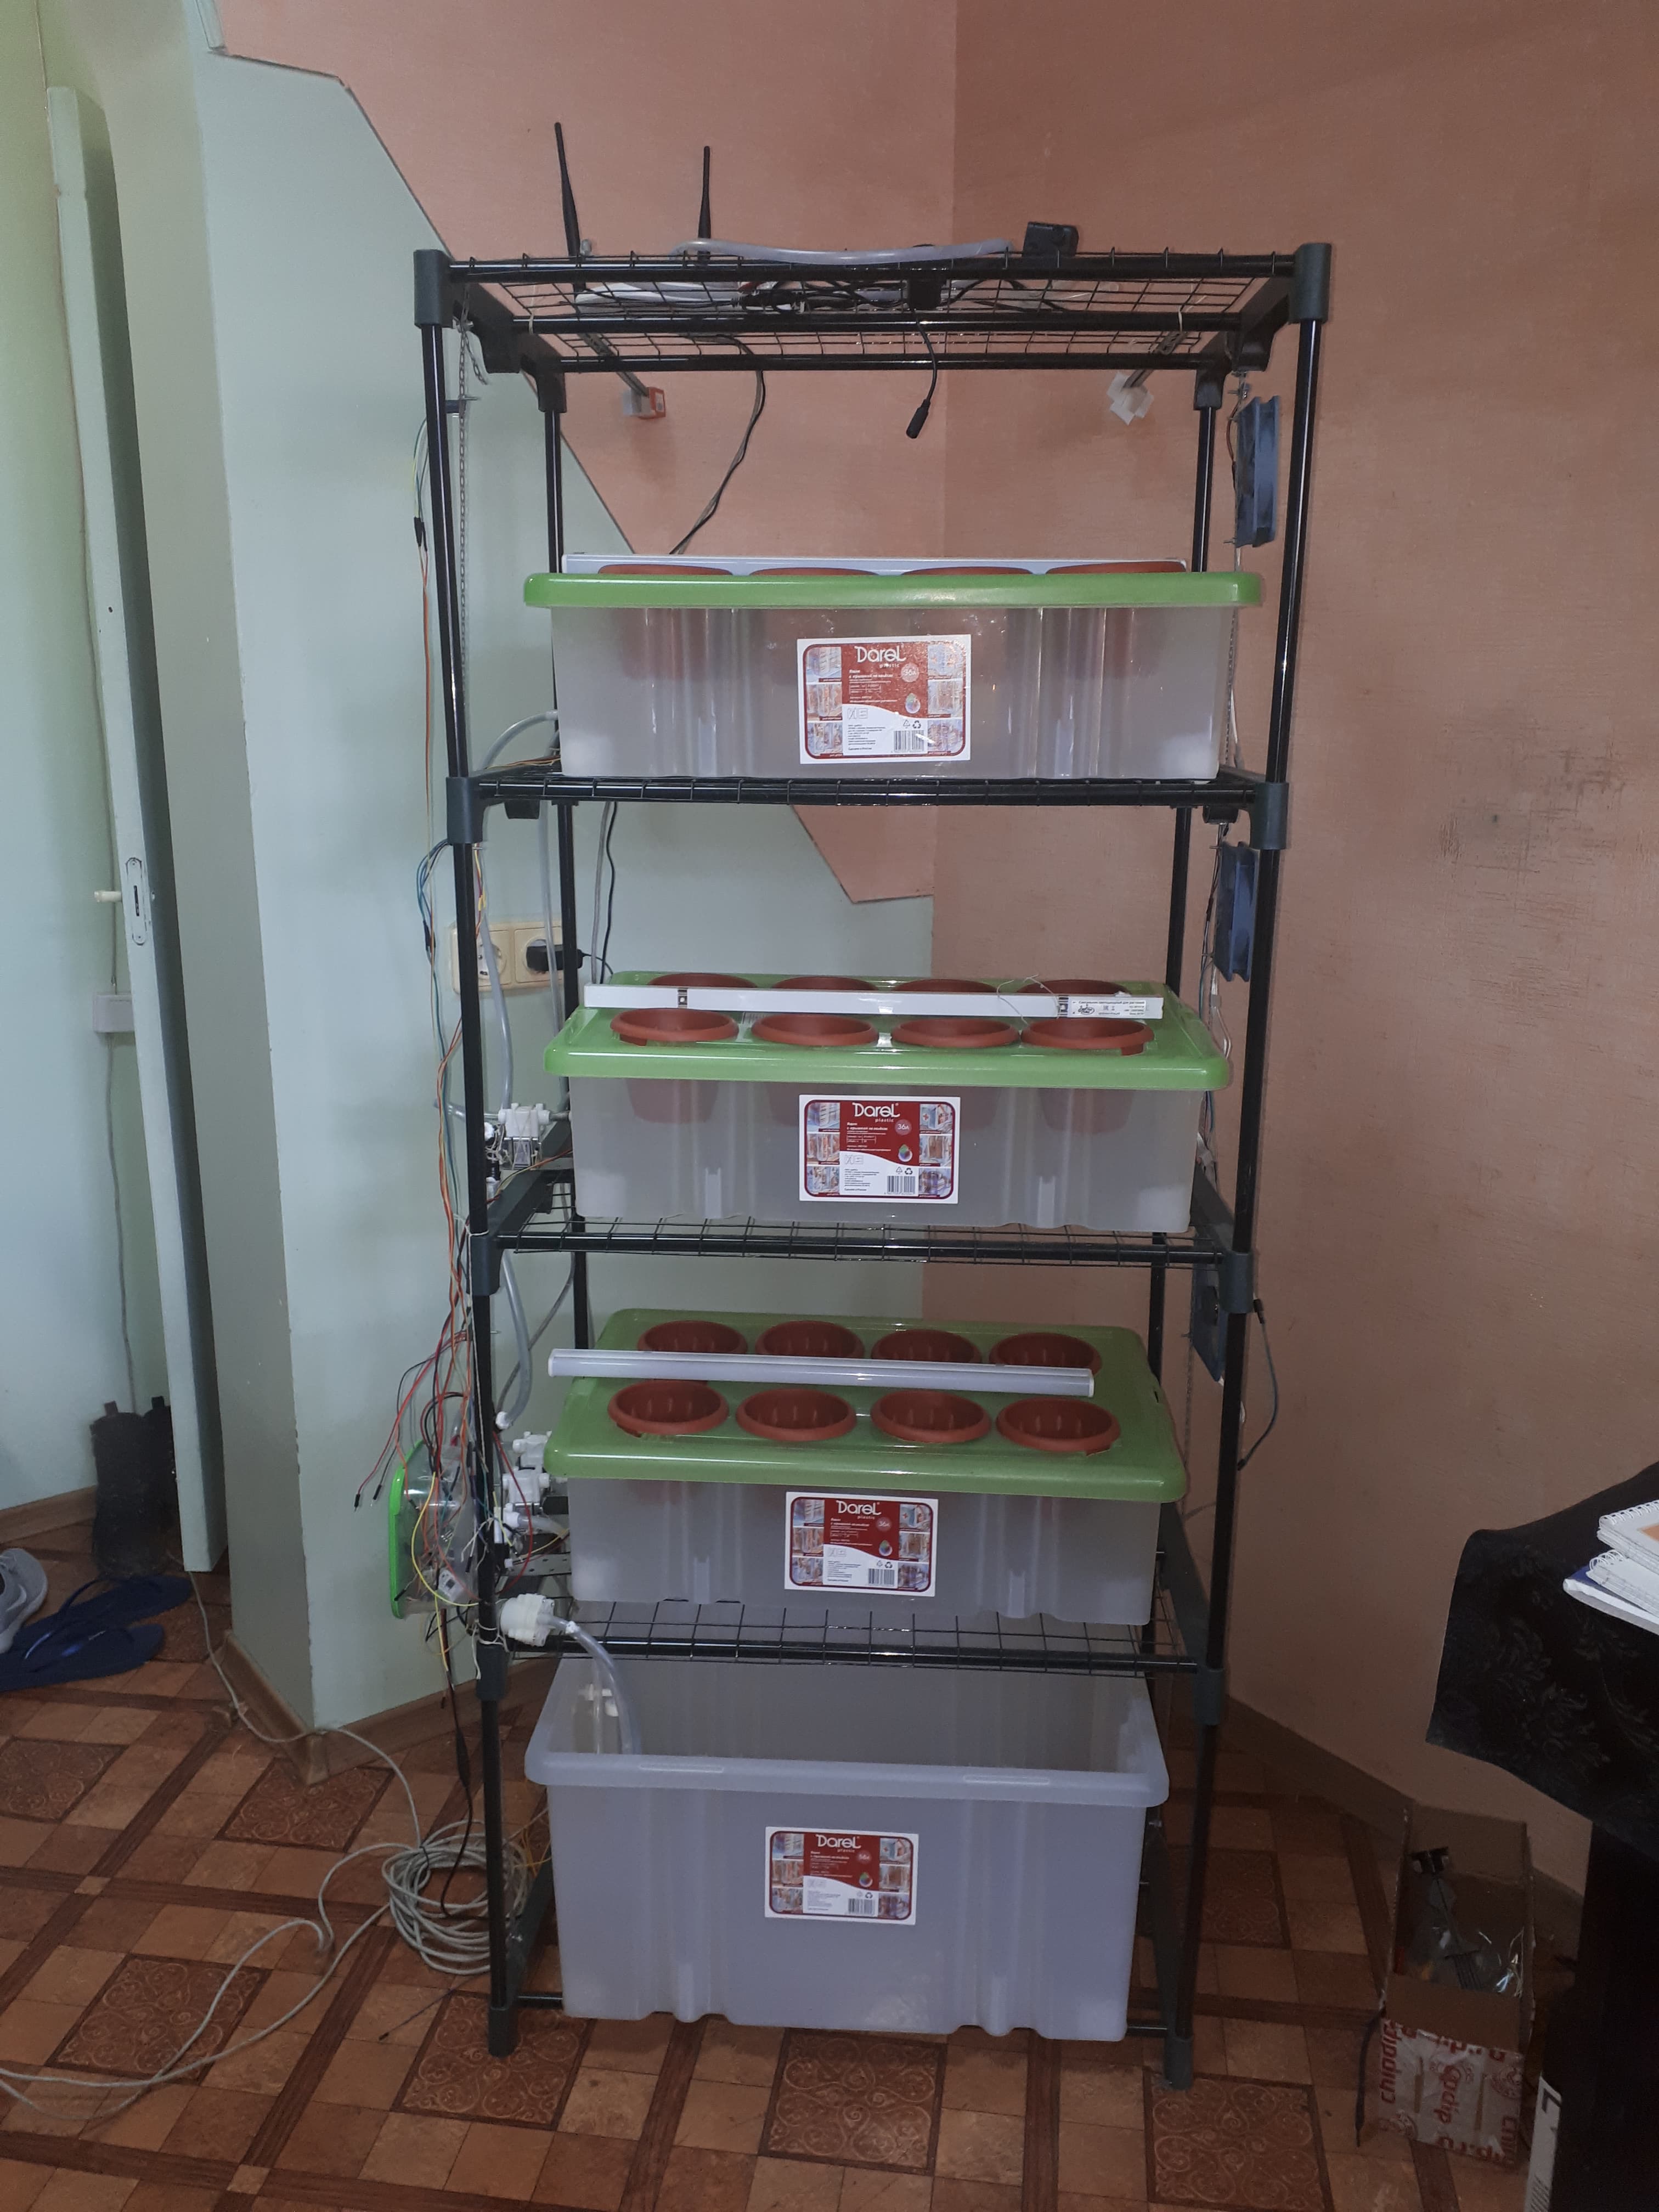
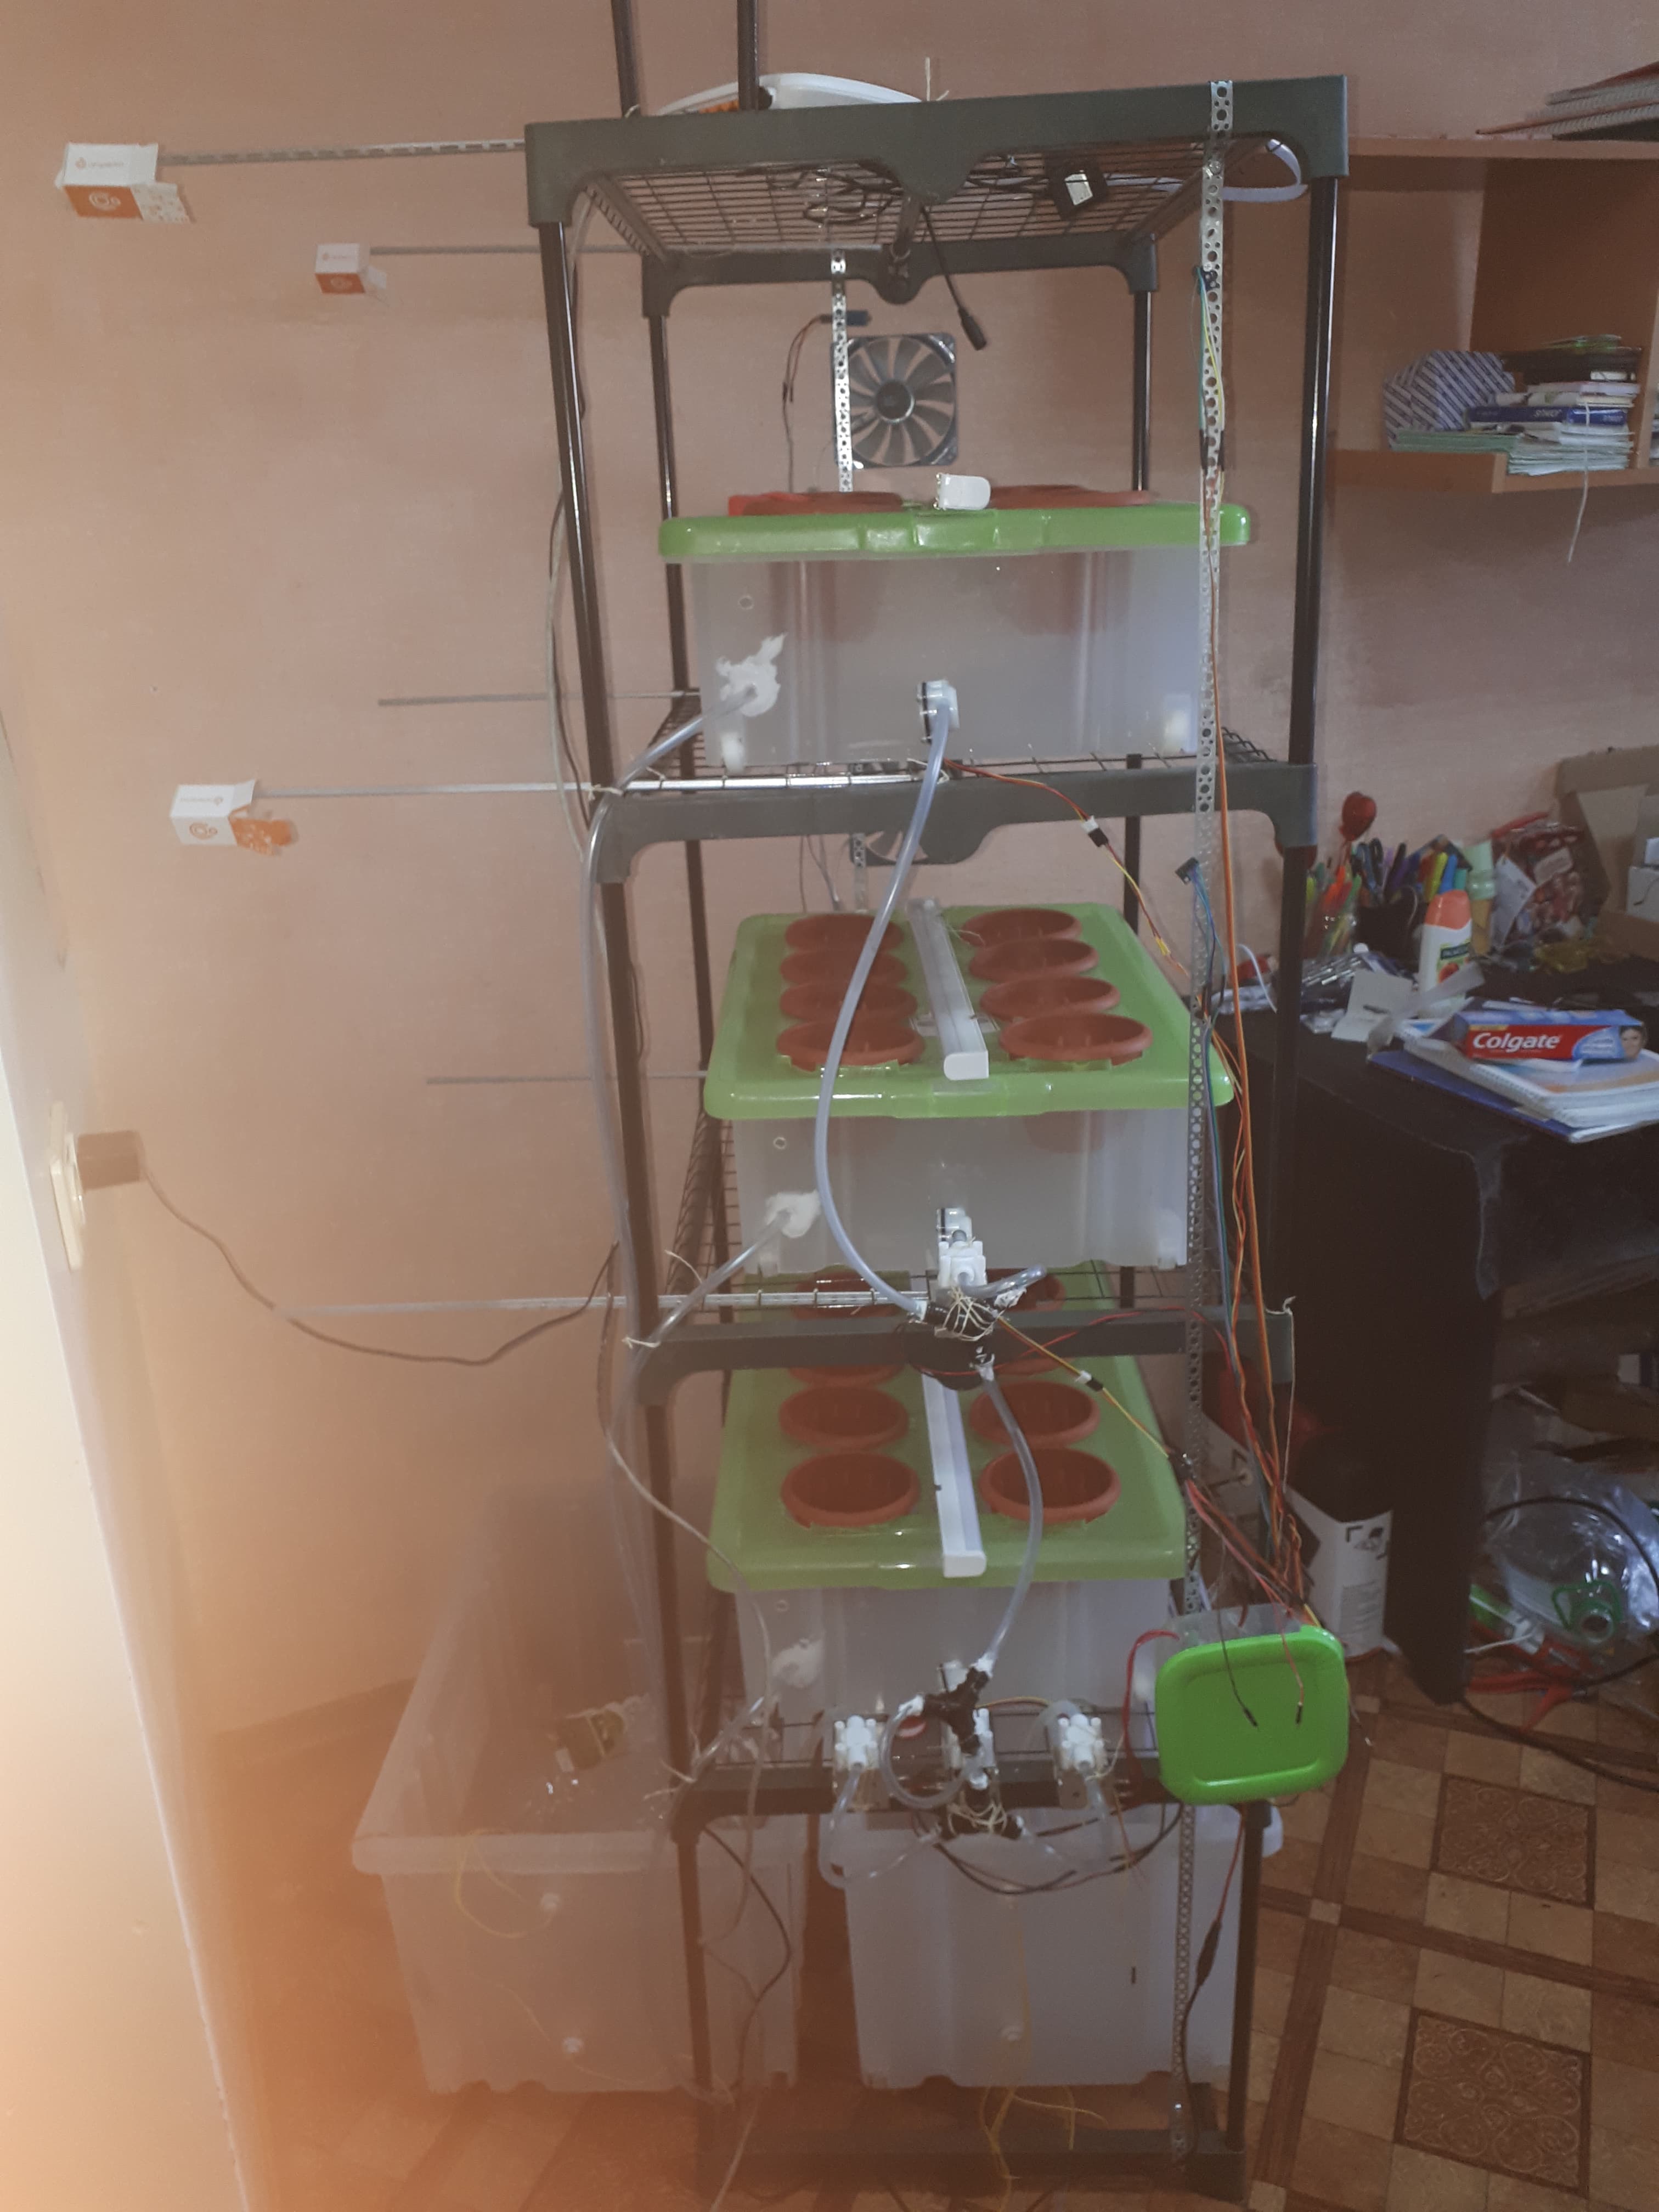
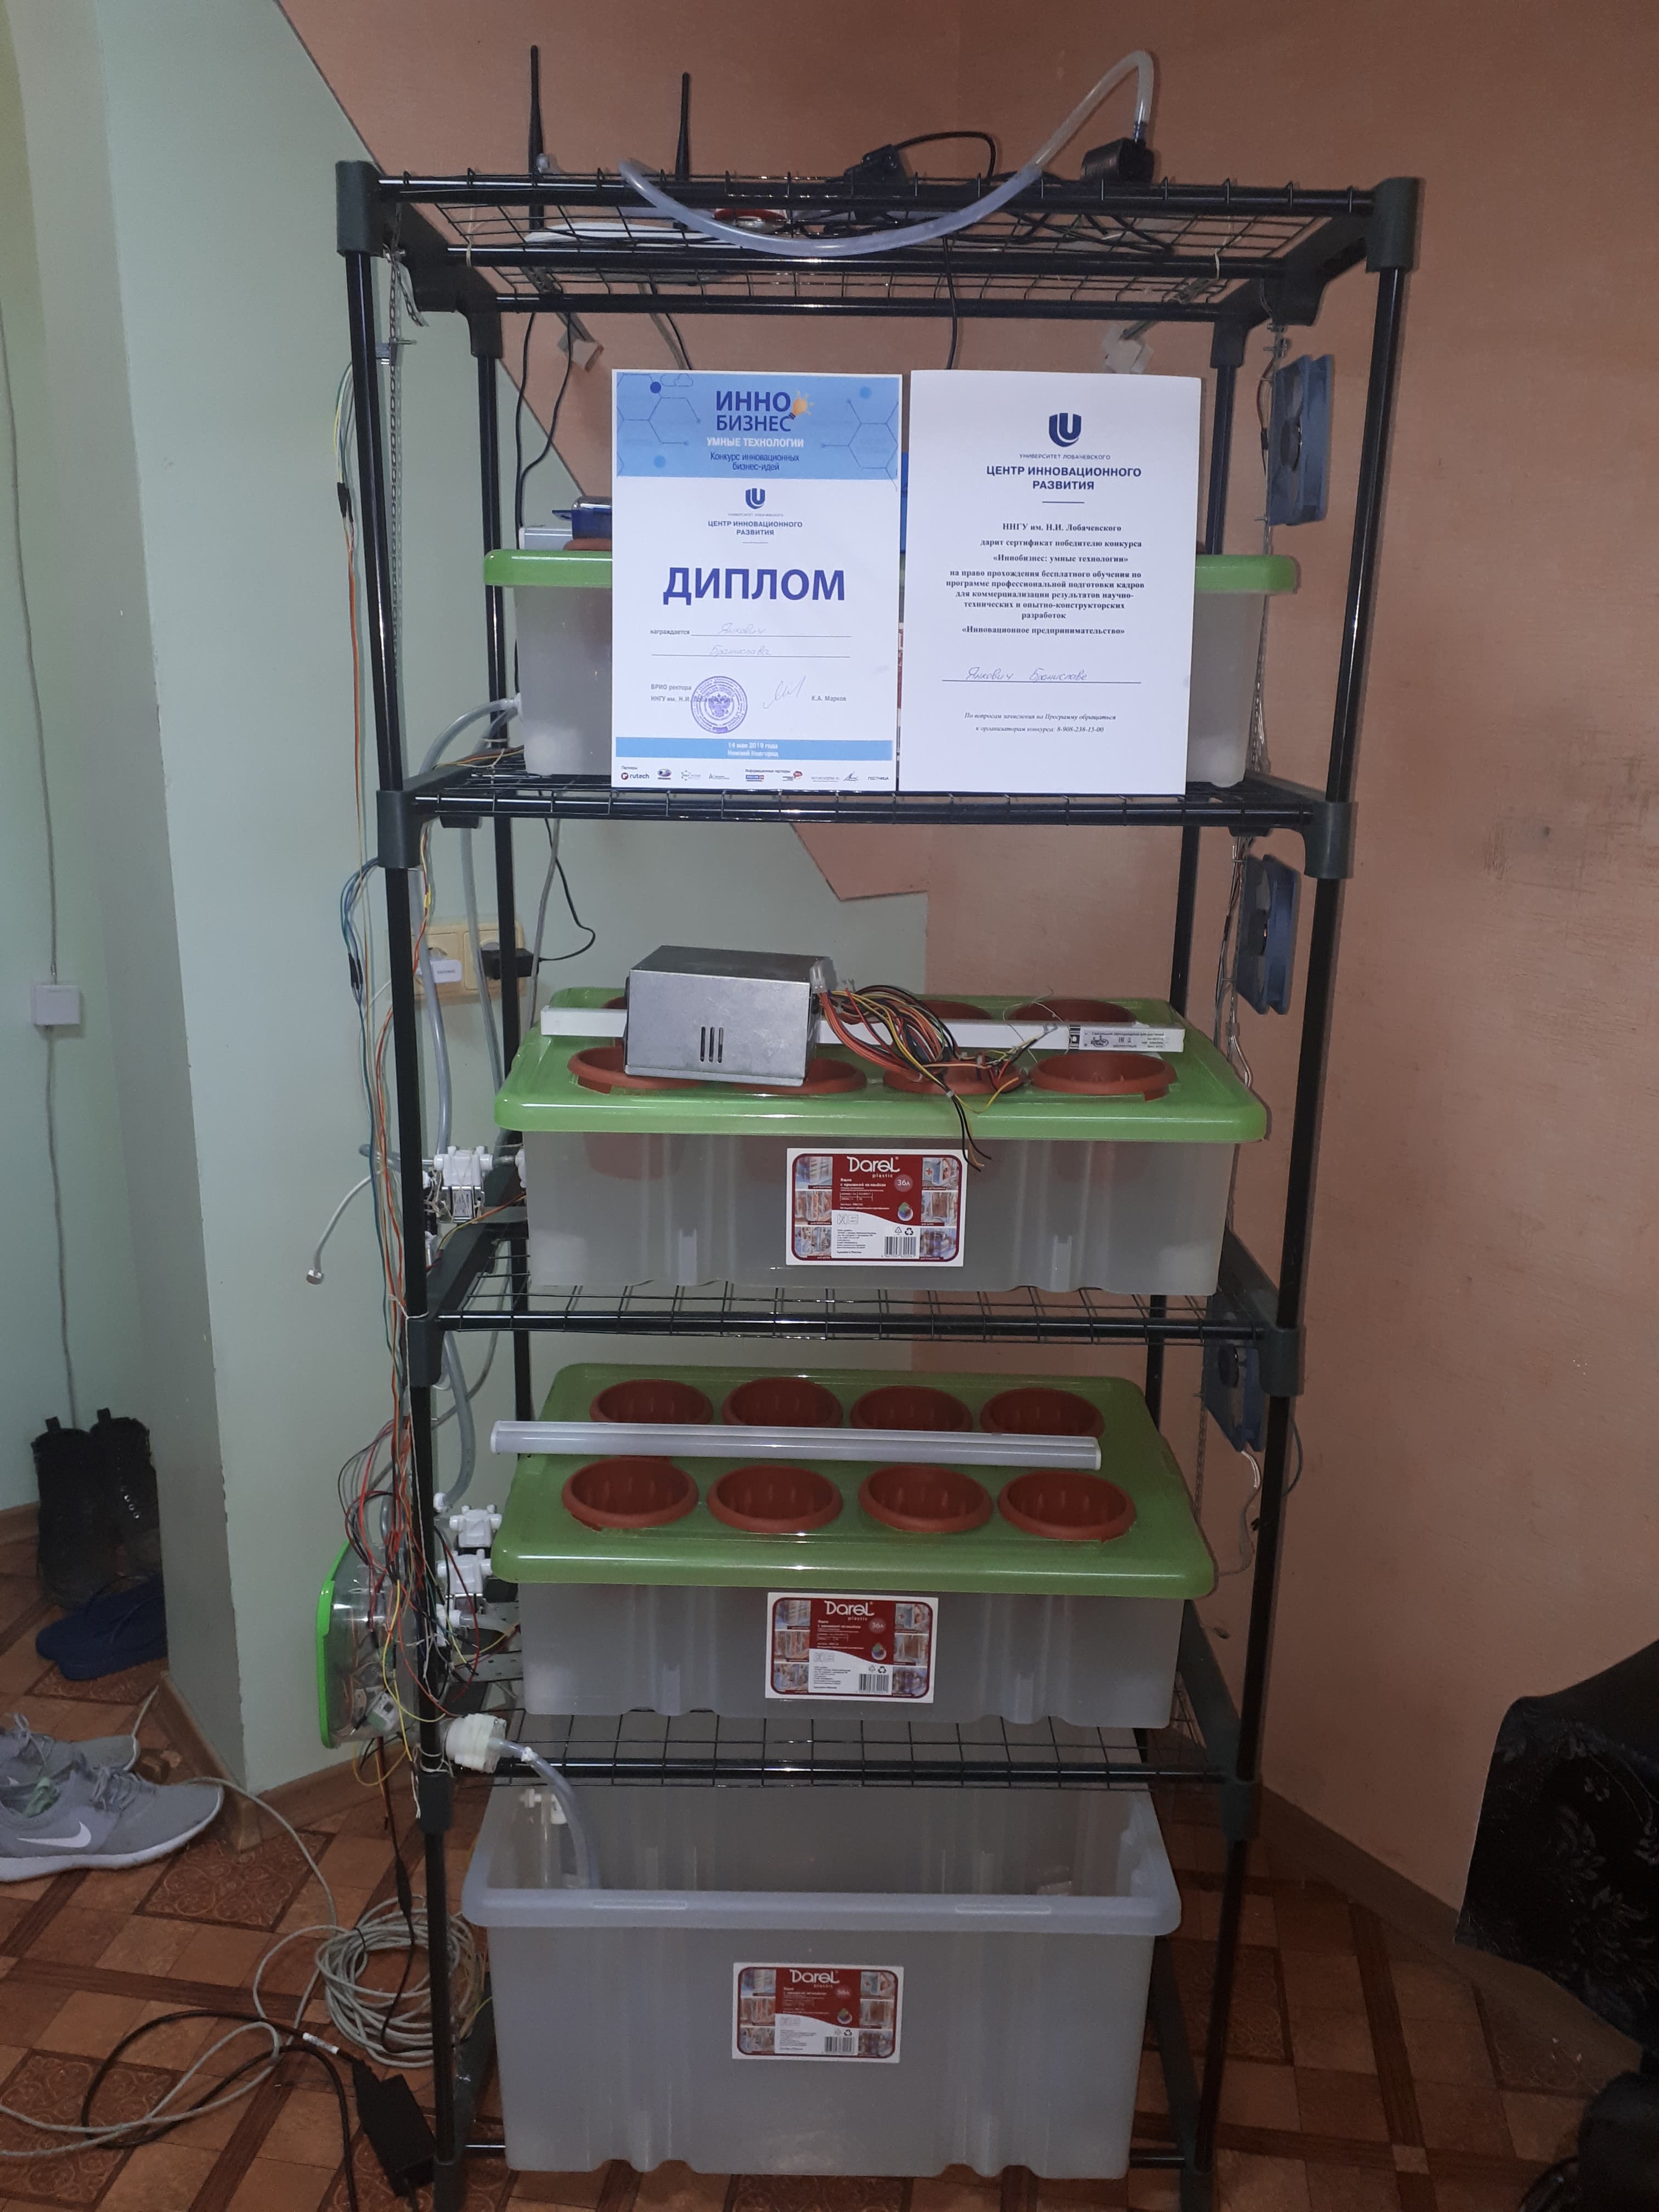
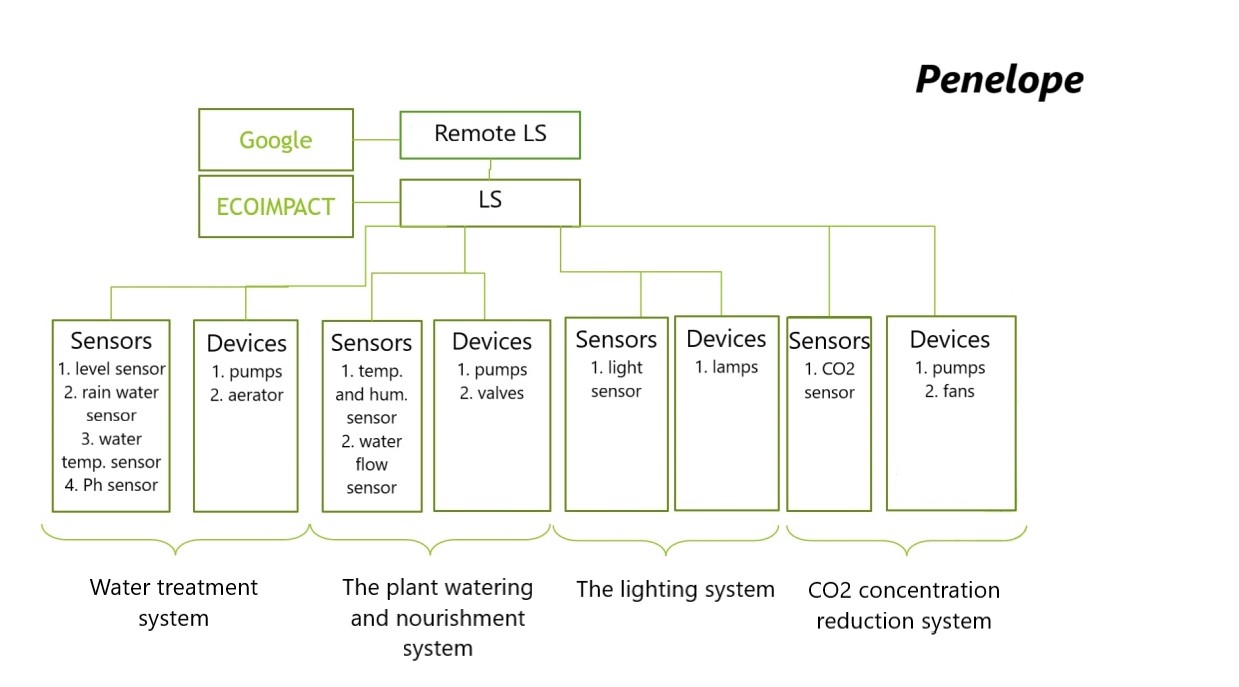
The greenhouse itself was built to have three-leveled shelves, with potted plants arranged on each tier, and the nutrient solution and water located at the base of the shelves. In order to better describe the greenhouse, further in the text we will discuss each system in place separately, starting with the water treatment system, and then moving onto the plant watering system, the lighting system, and finishing with the CO2 concentration reduction system.
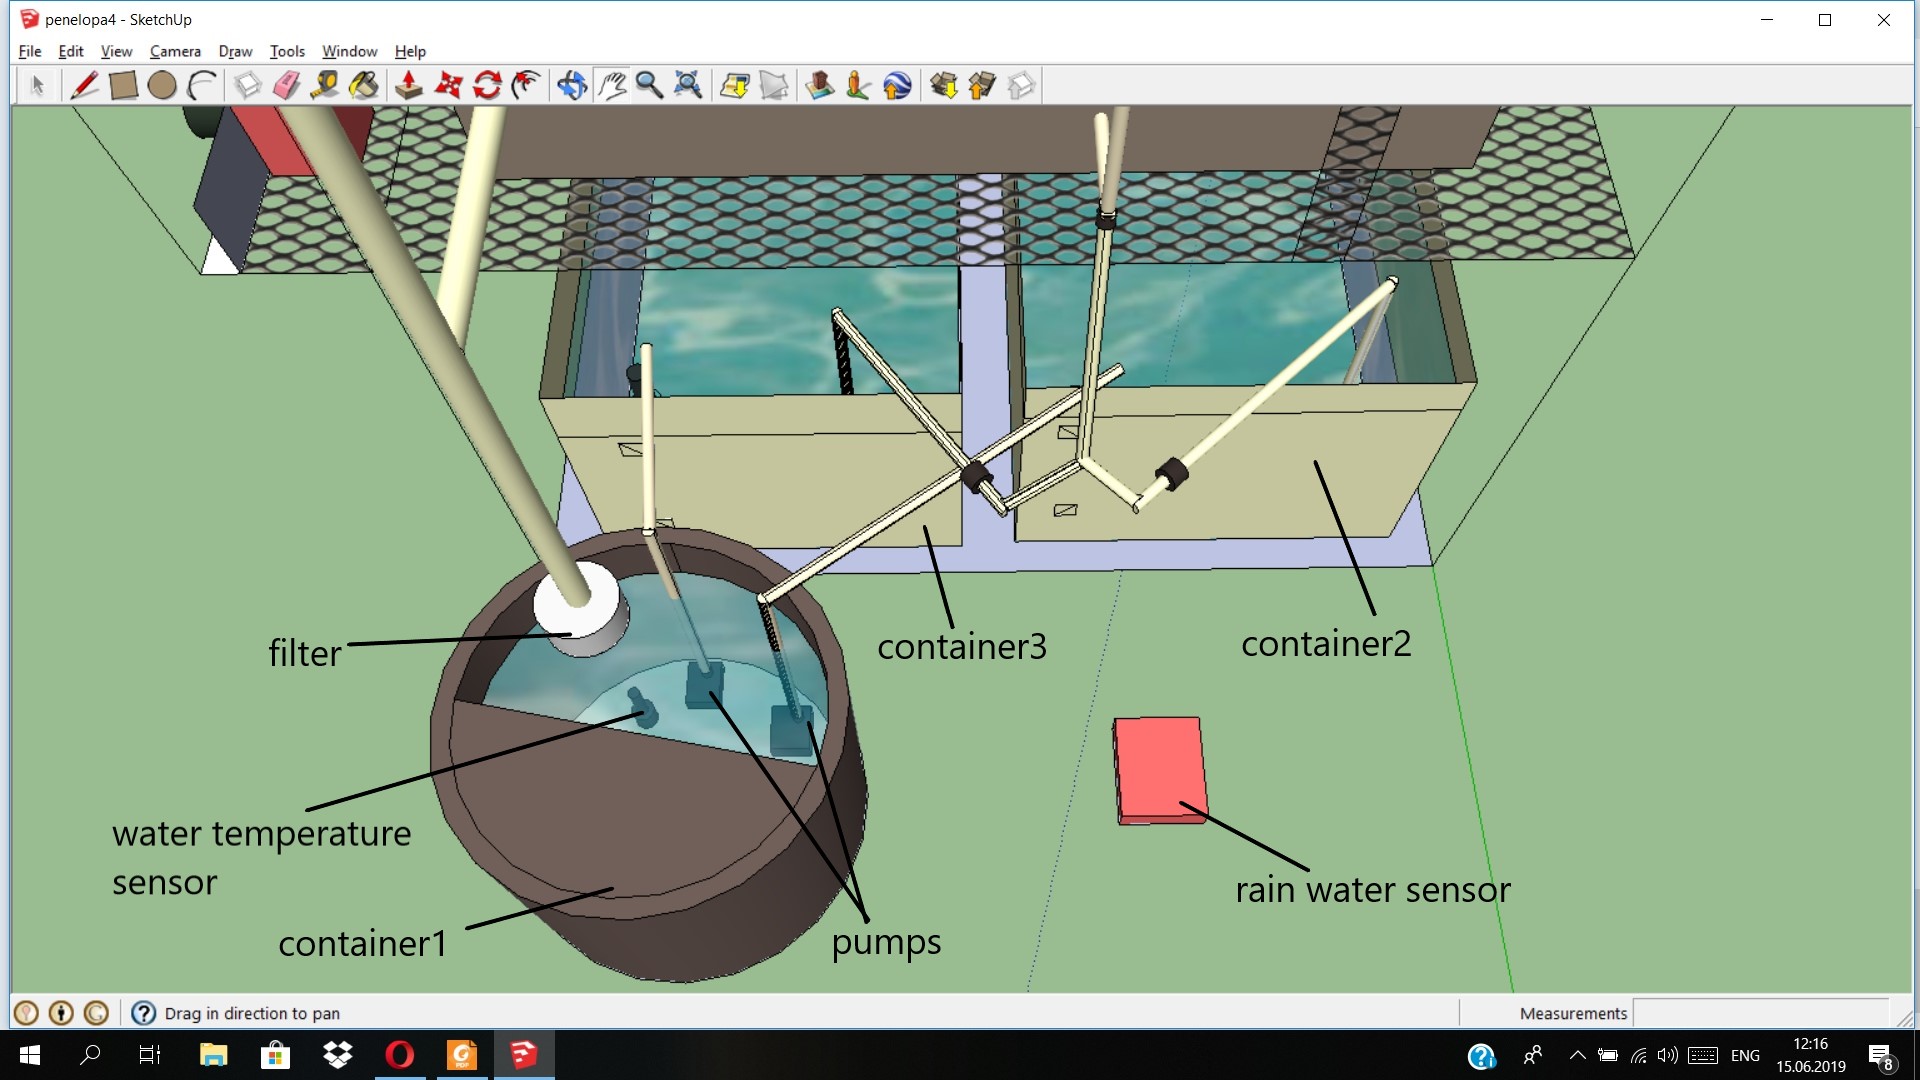
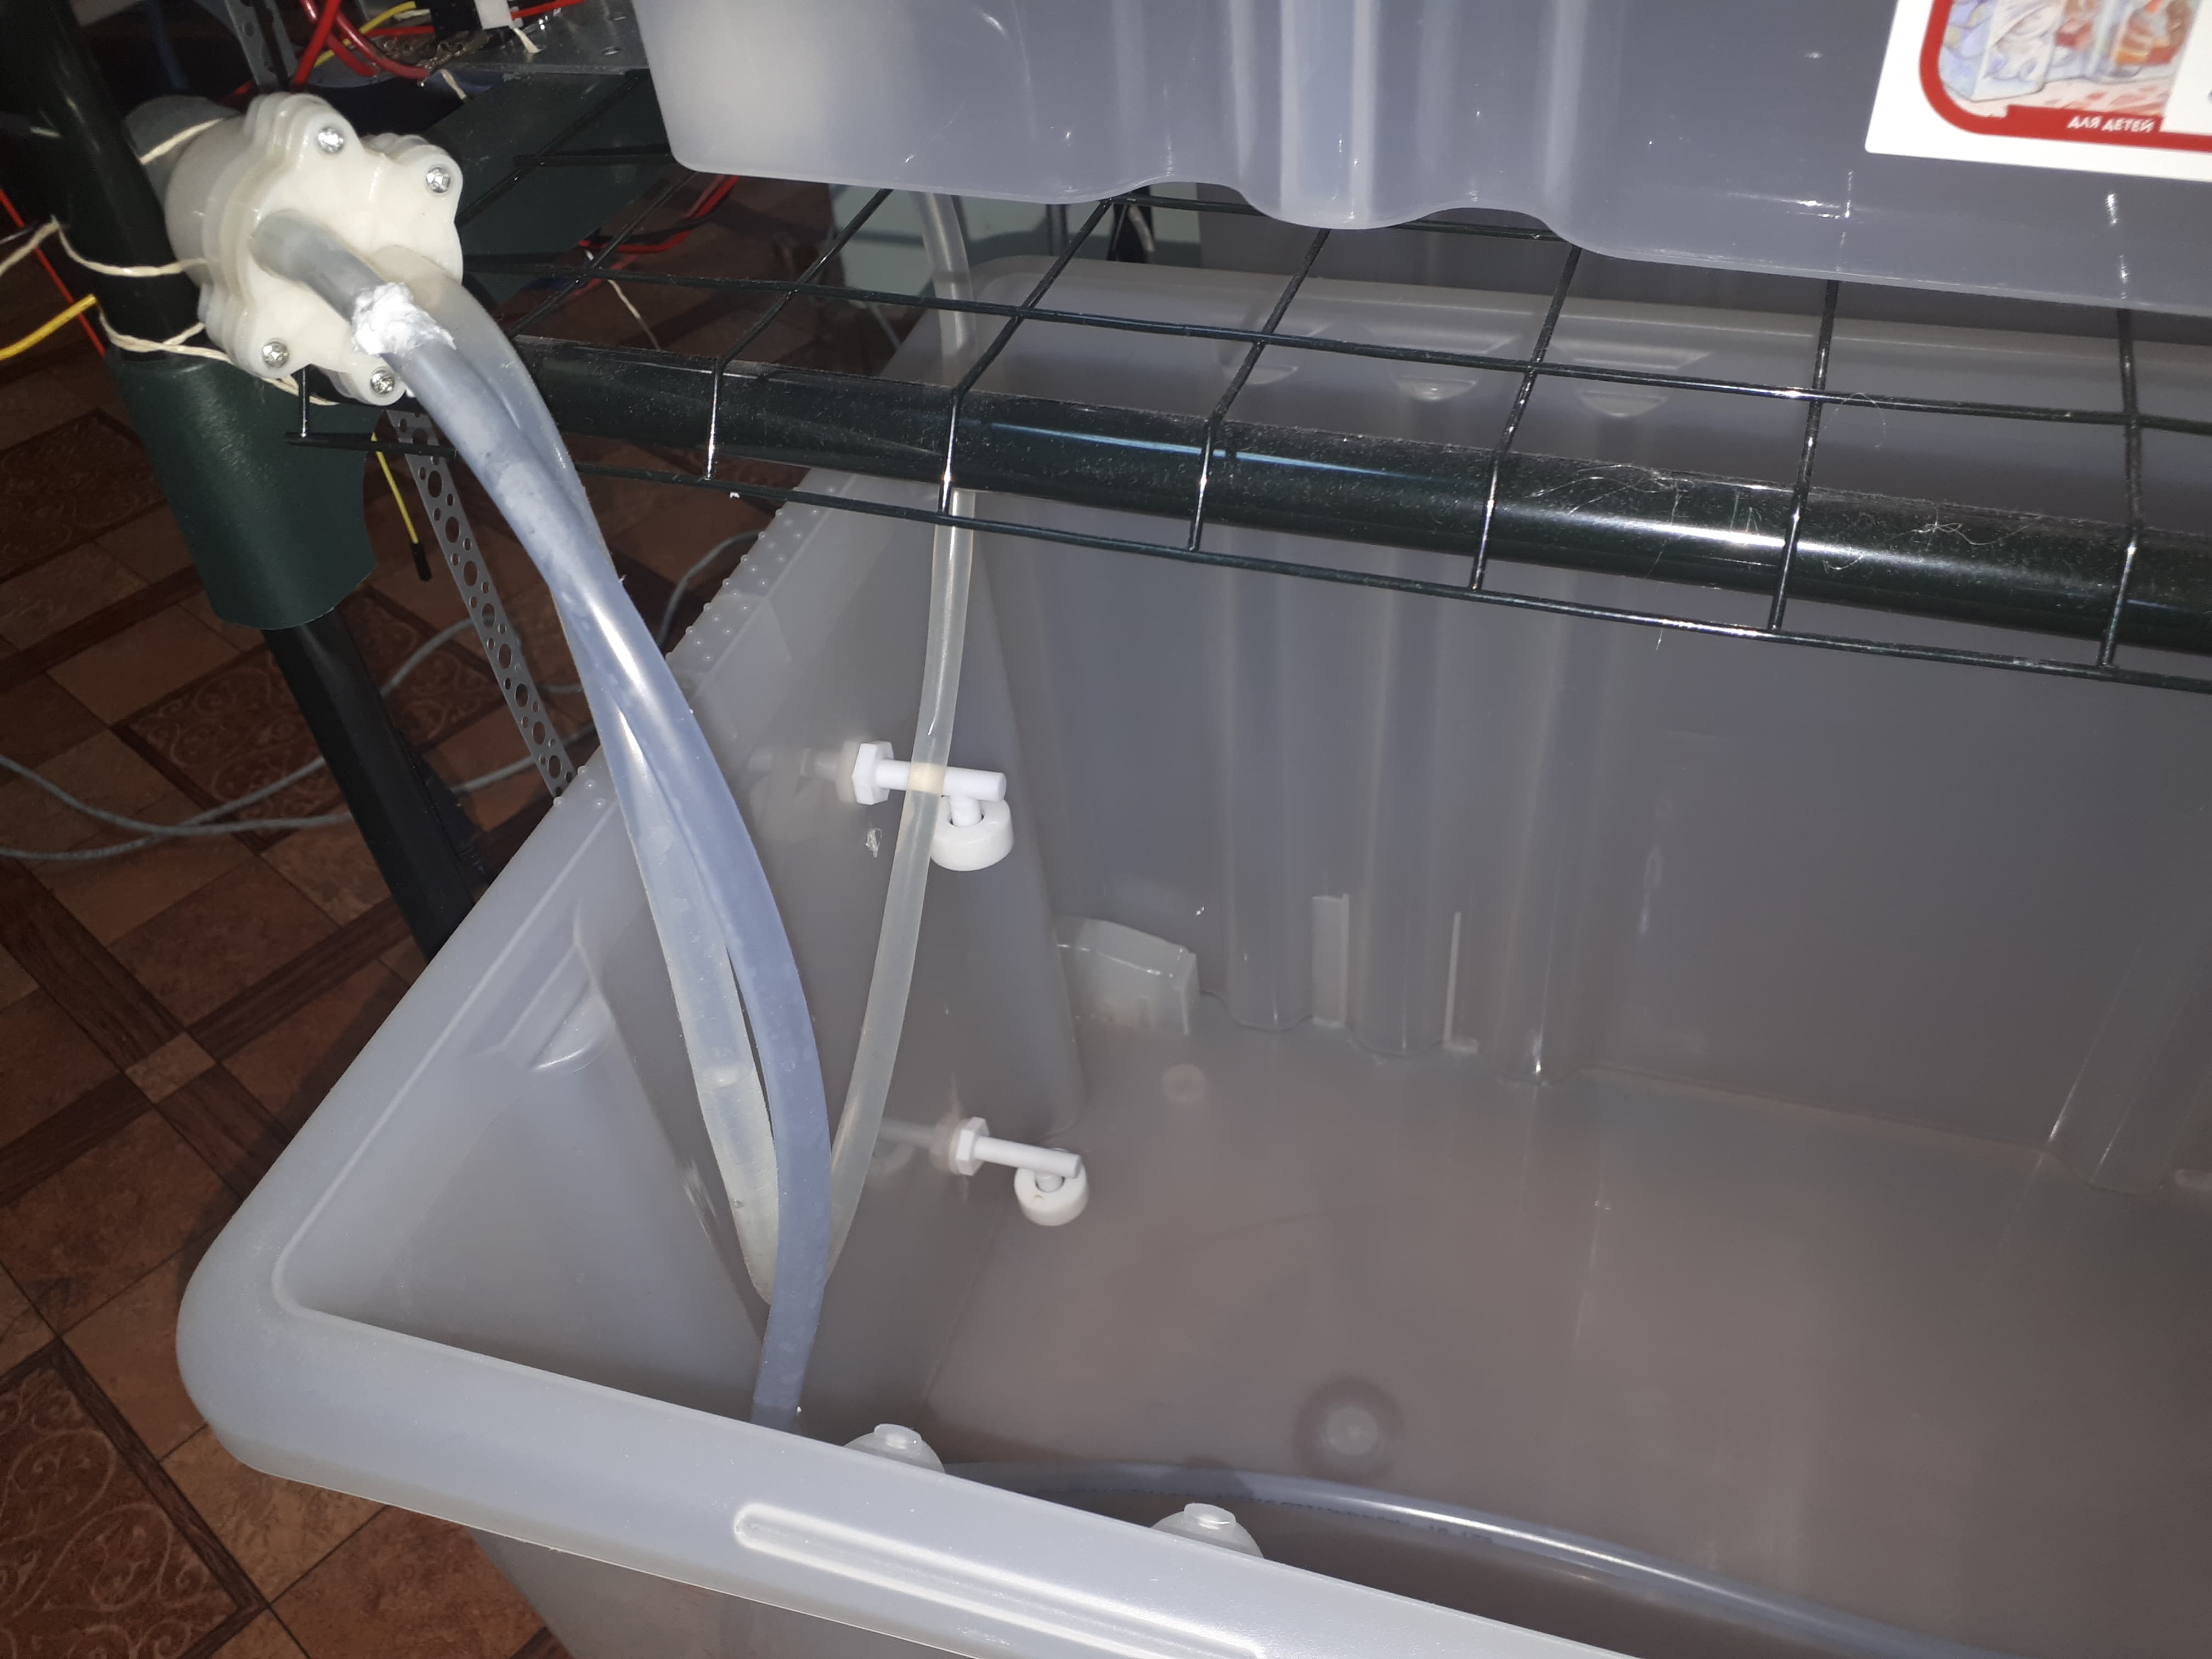
Considering that the quality of the resources needed for production affects the results of that production, it was not possible to simply use tap water for the nutrient solutions and plant hydration. That is why the water treatment system was put in place. The scheme of the system in question can be seen below.
As can be evidenced in the scheme, there are three distinct containers. Above Container 1 is a filter, which means that by the time water reaches the container it is already purified to a certain extent. In the container itself, there is a water temperature sensor, as well as two pumps that pump water into the water container (Container 2) and the container holding the nutrient solution (Container 3). The pumps are activated when the water levels in containers 2 and 3 are at a minimum, and they are deactivated once the water levels are restored to a satisfactory level. In order to determine the water level, a sensor was used. The reason for there being two pumps and not one pump with two valves is because two separate pumps were more affordable than one pump with two valves. Above the container holding the nutrient solution are two peristaltic pumps which are in charge of food dosage. Since it was necessary to keep in check the acidity level of the nutrient solution, an acidity sensor was installed in the Container 3. It should be added that in the ground next to our facility is a sensor which is activated as soon as water comes in contact with it, which is why it can also be considered a part of the equipment used in this project.
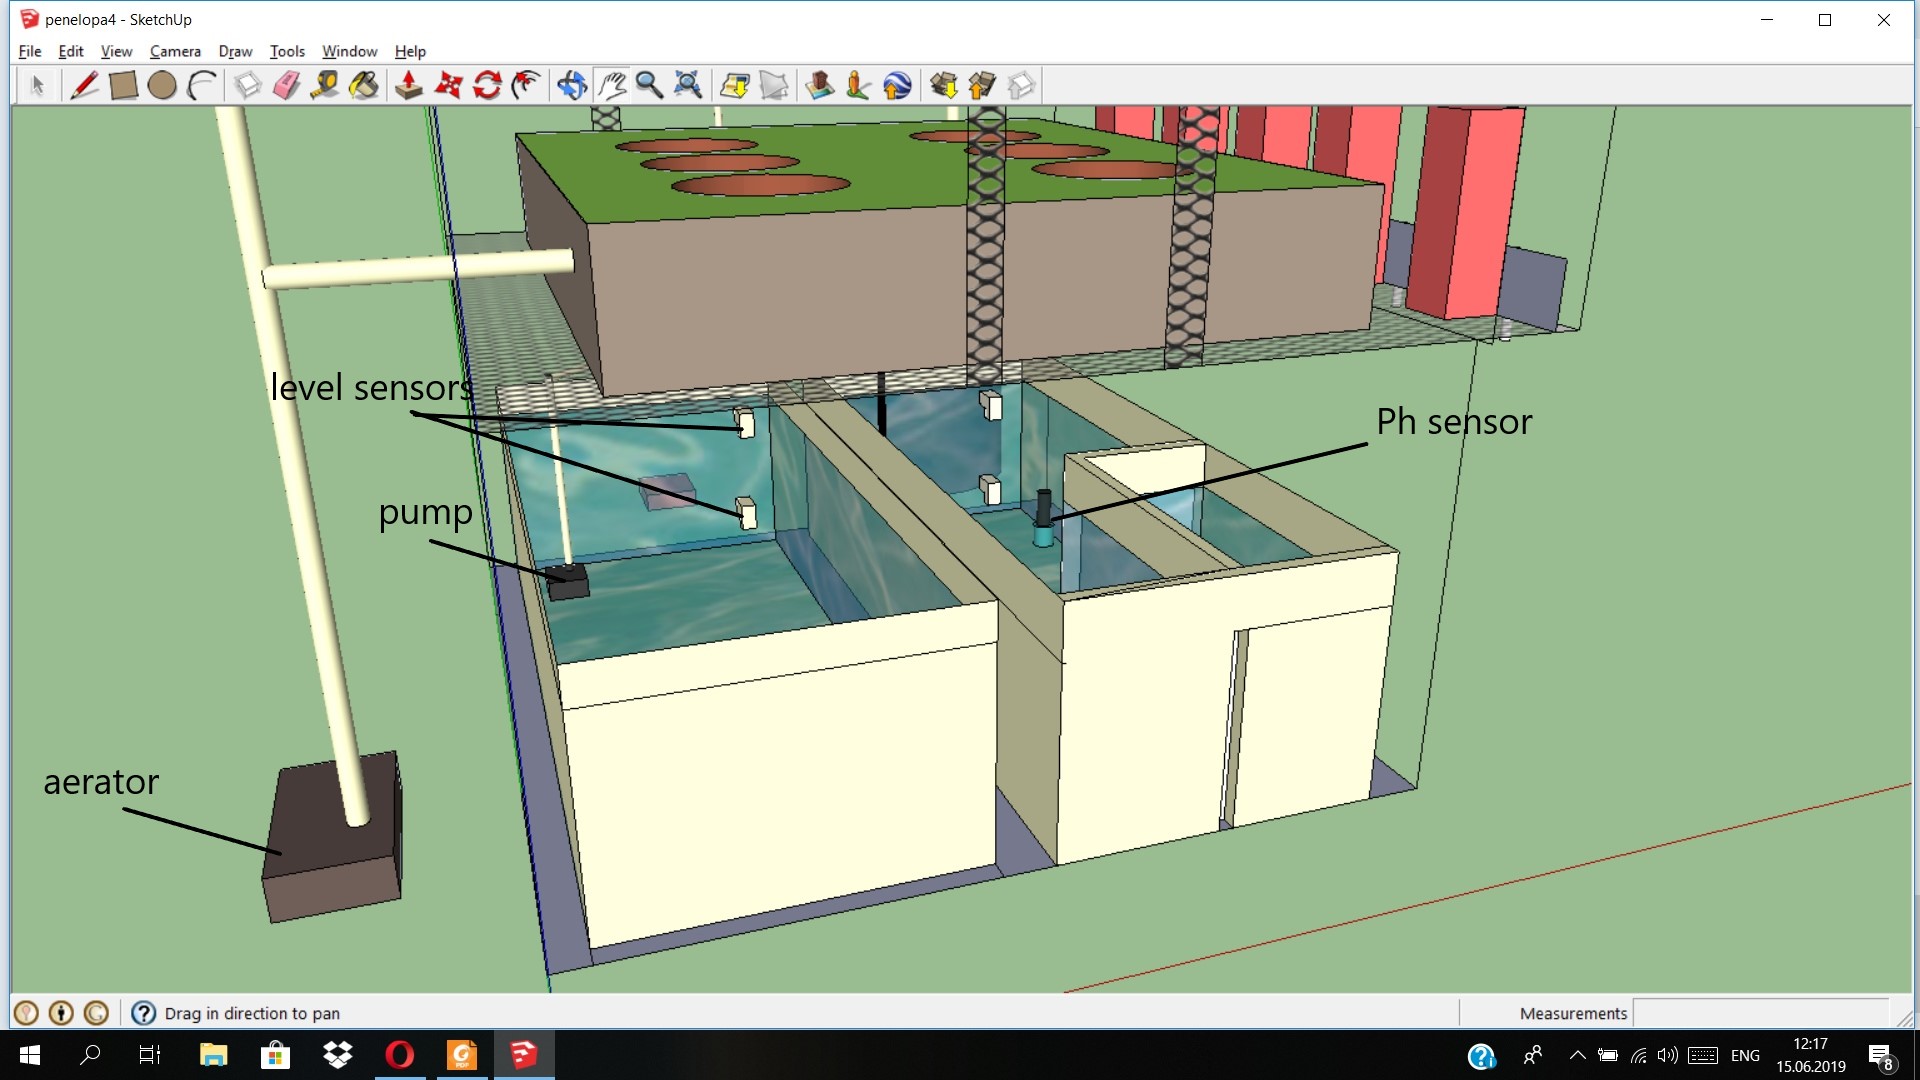
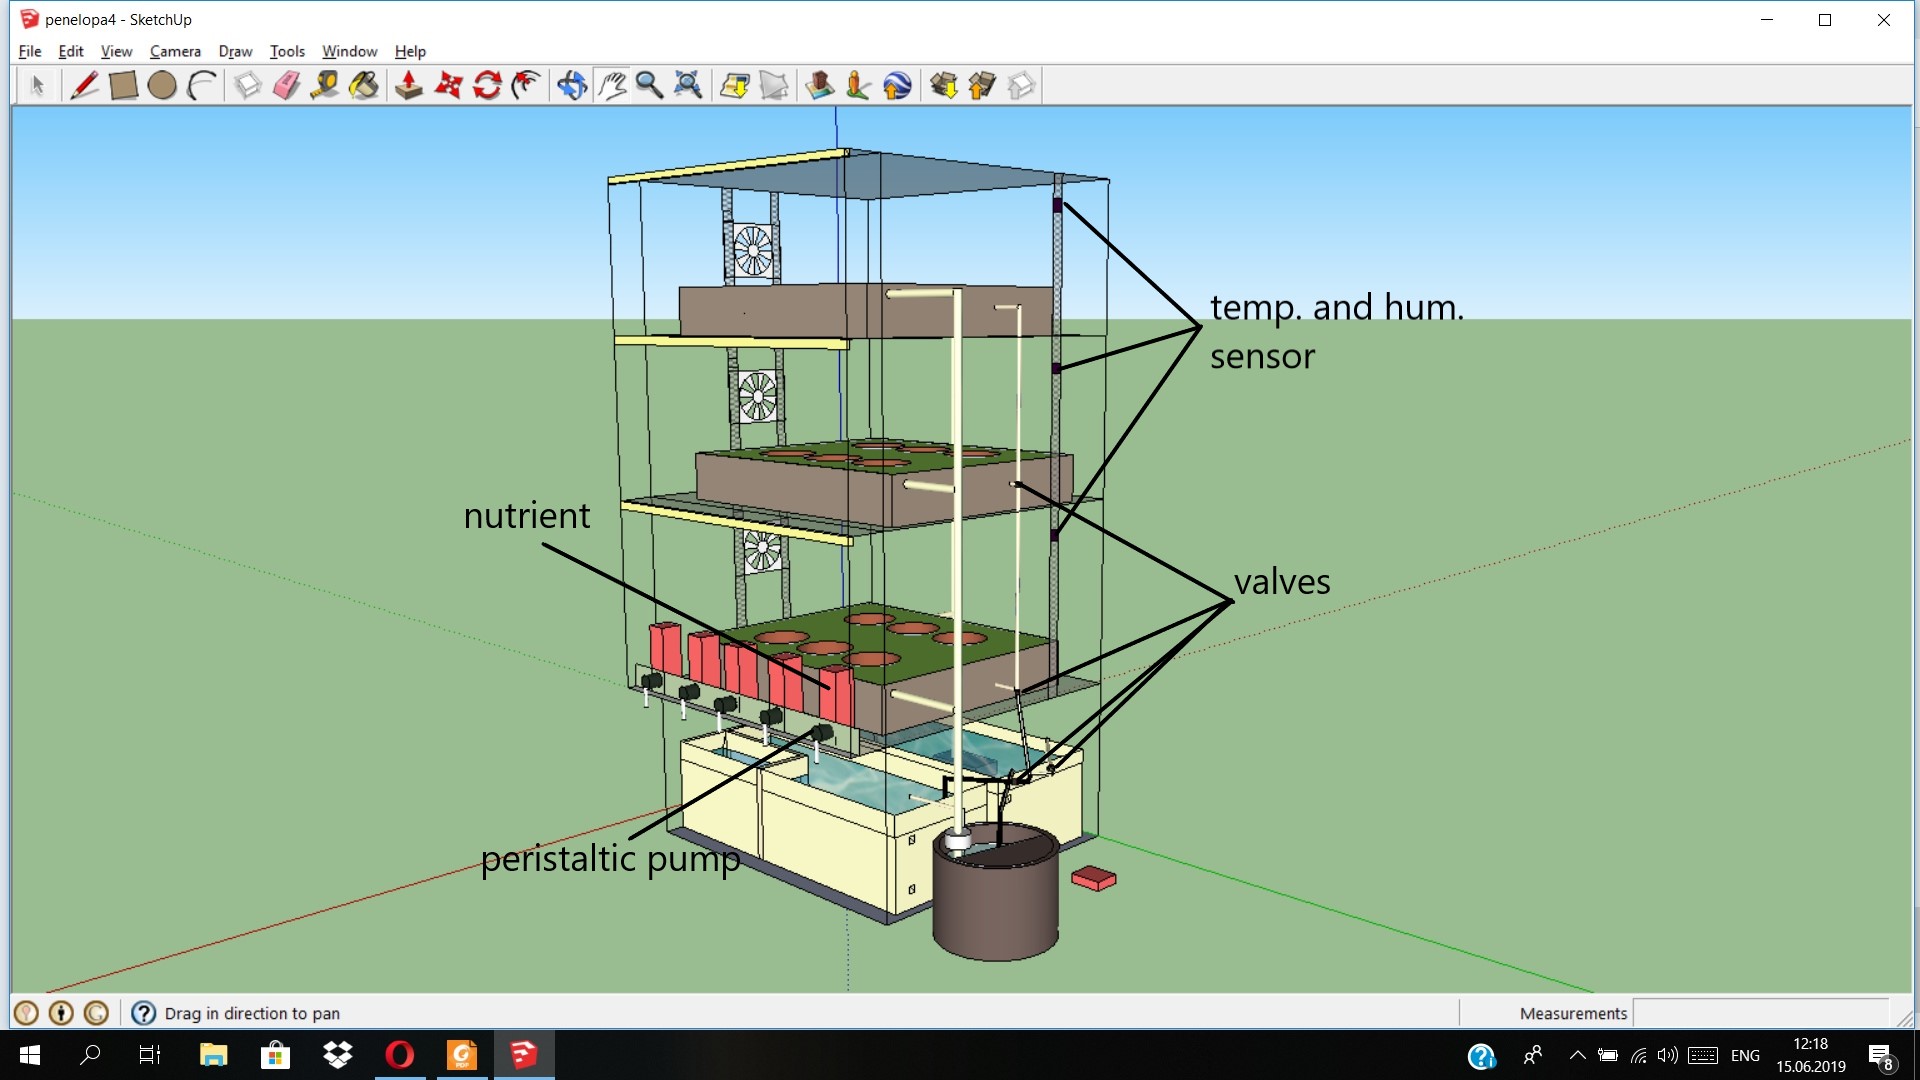
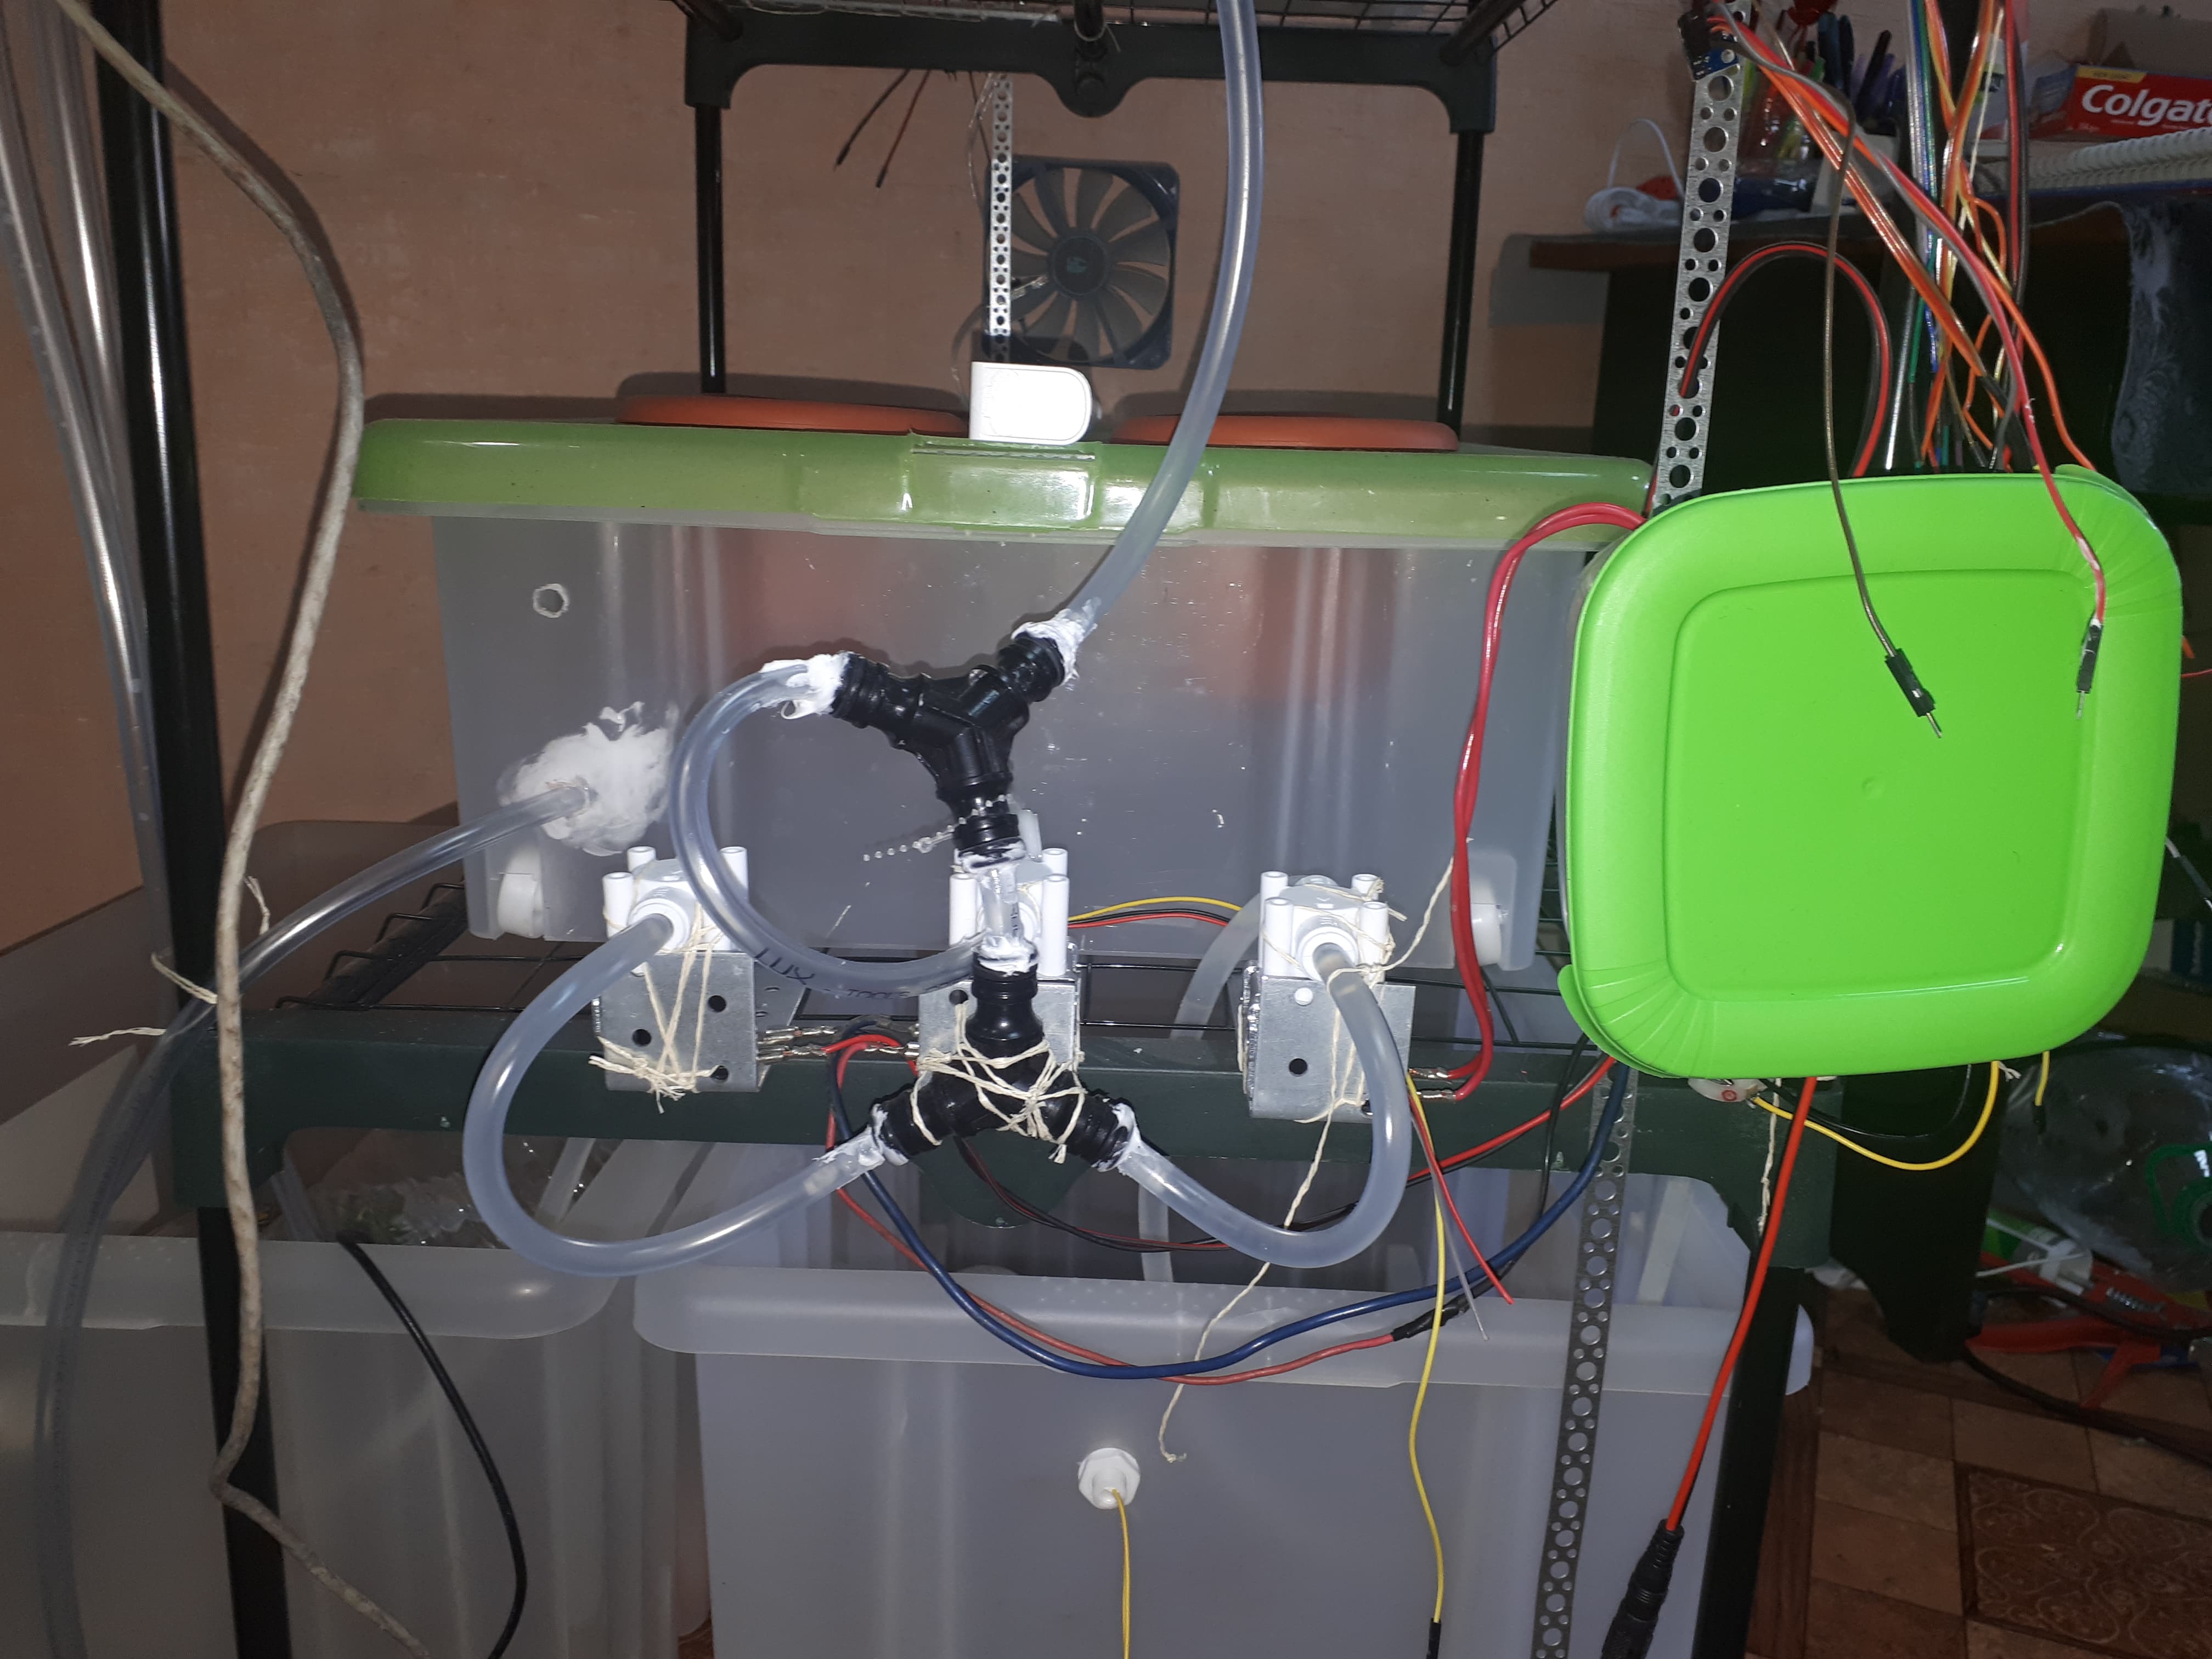
Considering that the project created based on the hydroponics principle in which the roots of the plants are periodically submerged in water, it was necessary to have a means of inflow and outflow of water and the nutrient solution. Two pumps which are located in Containers 2 and 3 were used for the inflow of water, and they were activated depending on what the plants needed - if the plants needed water, the pump in the second container would activate and the water would start to flow towards the first valve. The given valve opens when a command is sent from the computer. Once it leaves the first valve, water has two choices - it can either flow towards the second valve and start filling the Container 3, or it can flow toward the third valve and begin to hydrate the plants. Since it was not necessary to fill the third container with water, a command was sent from the computer to have the third valve open, while the second valve remained closed (when the nutrient solution is added, the second and the third valve will be opened, and the first one will stay closed). The water then starts to fill the first pot of plants until there is a satisfactory level of water in it. The amount of water in the pots can be controlled via a program. In case of a breakdown, the pots have wide pipes installed which lead excess water to the Container 1. Once there is a satisfactory amount of water in the first pot, the third valve is closed and the water flows up towards the fourth valve which allows the water to flow in the second pot of plants. Much like the first pot, the second one also has a water level sensor and the wide pipes for excess water. When there is enough water is the second pot, the signal is sent to close the fourth valve, and the water starts to fill the last pot. There is no valve at the last pot since the water stops flowing into the last because the pump itself turns off. This is the result of a sensor detects the appropriate amount of water in the pot. As soon as the pump turns off, the water starts to flow back into the Container 1 via narrow pipes which are located at a certain level in the pot. The water does not completely flow out of the pipes since they are positioned a bit above the bottom of the pot. In order for the water from the first and second pot to flow out, it is necessary to open the third and fourth valve. The reason for using sensors which detect the amount of water used and not the ones detecting the level of water is because the researchers also wanted to examine how different amounts of water and nutrient solution affect the growth of the plants. With a system like the one used in this project it is possible to grow several different cultures in one greenhouse. It is also important to note that temperature and humidity sensors, which tracked minimal changes in the given parameters were part of the system, as well as an aerator which supplies the necessary amount of oxygen, in order for the roots of the plants not to rot.
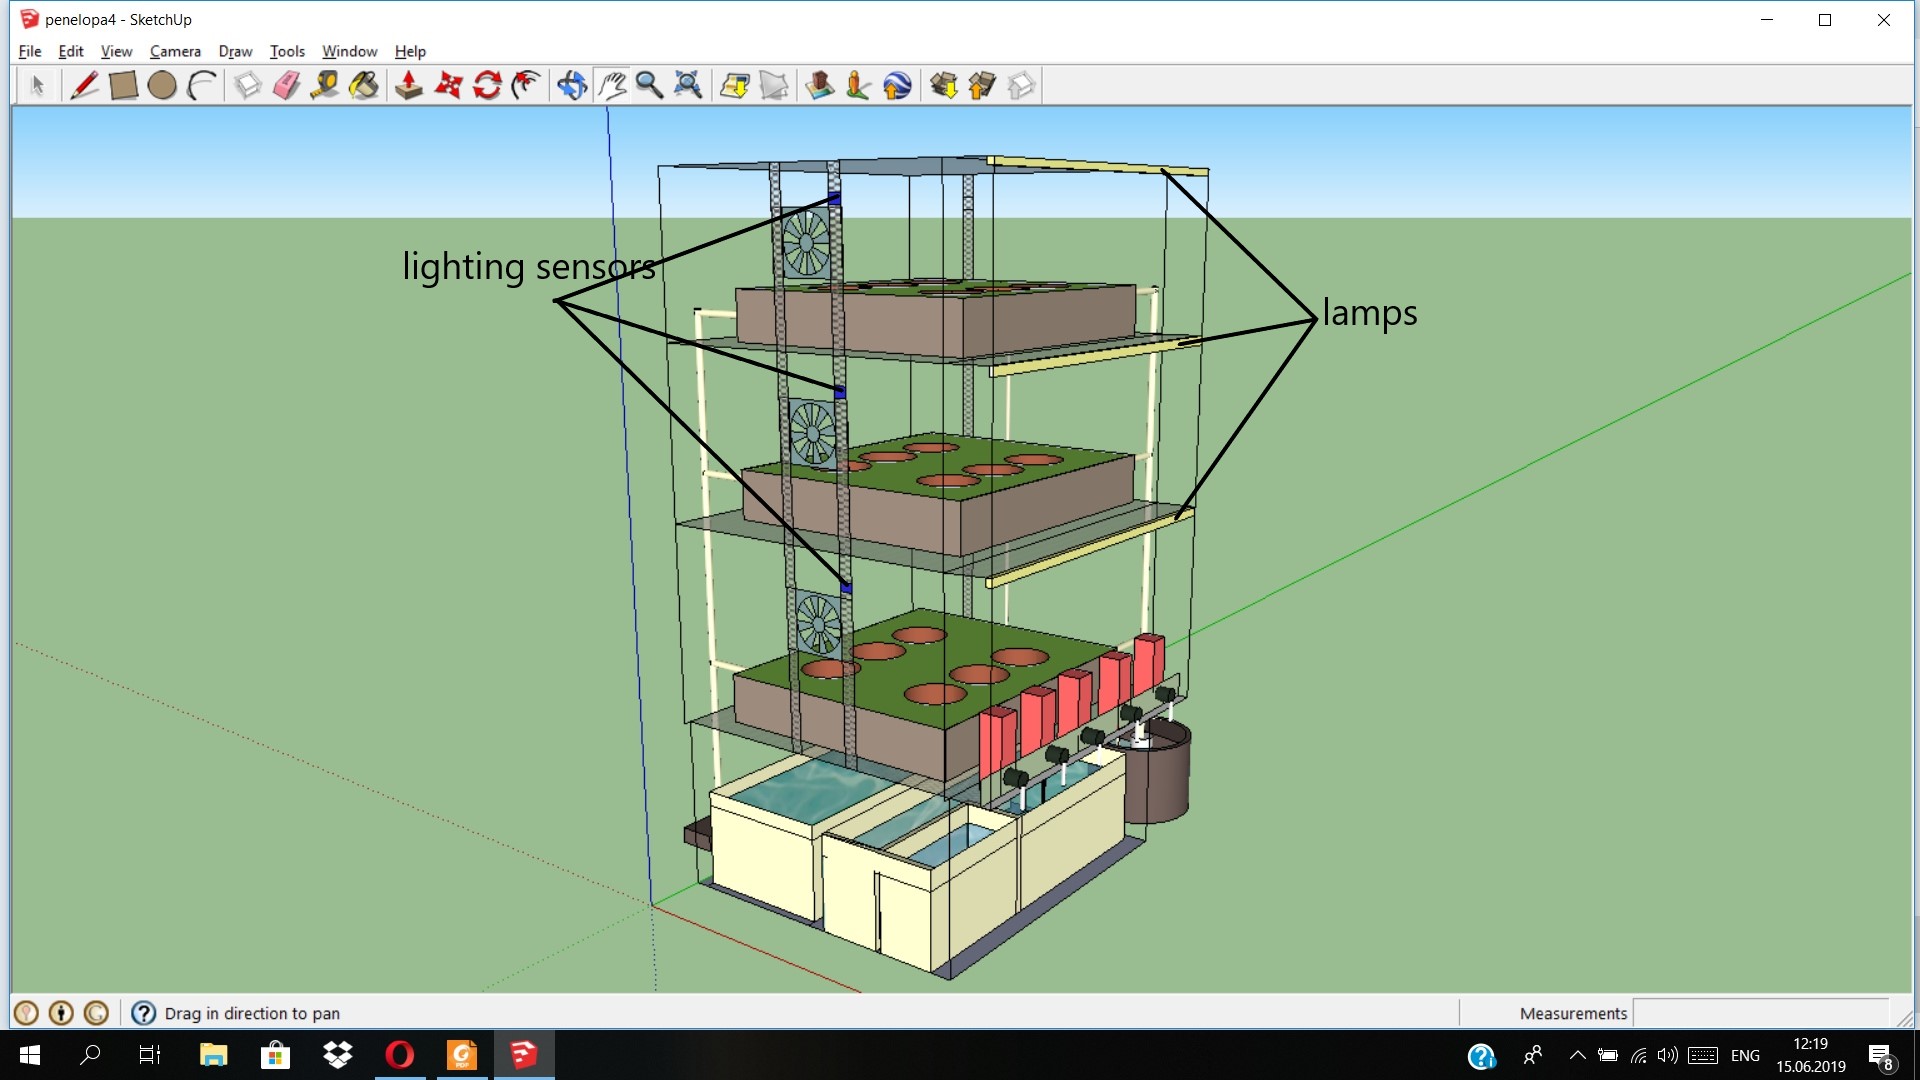
The lighting system is comprised of three phyto lamps which are positioned far enough from the plants so as not to dry out or burn the leaves, and not to trigger the lighting sensor. If the room where the greenhouse is located is too dark, the lighting sensors will register that and turn on the lamps.
Considering the fact that plants need CO2, it was only logical to have such a system integrated in the facility. The CO2 was created and collected during a reaction between citric acid and sodium bicarbonate. In the materials provided below, it is possible to see the calculations and predictions for the expected amount of CO2. The citric acid and sodium bicarbonate are added to fourth container as a solution by peristaltic pumps, and that is when they start the reaction. From the given container, the CO2 starts to evaporate, and with the help of fans positioned at each level, it reaches each plant. In order to be able to constantly monitor the level of CO2 in the greenhouse, a CO2 sensor was incorporated into the system. The consequences of being overexposed to CO2 are well known and dangerous to people, so the greenhouse needed to be isolated and the exact same CO2 sensor needed to be placed outside of the greenhouse so as to always have the ability to check CO2 levels in the room, as well as to detect any potential issues due to breakdowns which could cause the increase of CO2 in the room.
The table reflects institutional elements with their descriptions and market prices.
We deployed our project in a room in our home, the development which you can see in the following photos.
For more click here:
https://ecoimpact-ple.com/documents/s/zPAJqwt3djz83TcH2D9TFtle7E
We connected Penelope to a local server so that we would be able to access and control the system from a remote location, as well as for monitoring plant growth. For a local server we chose the Orange Pi platform which came recommended to us by the Research Laboratory of Basic Physics and Technologies of Wireless Communication. We imagined that our device would connect to a local server via Wifi, so we decided to host the entire project on three NodeMCU platforms.
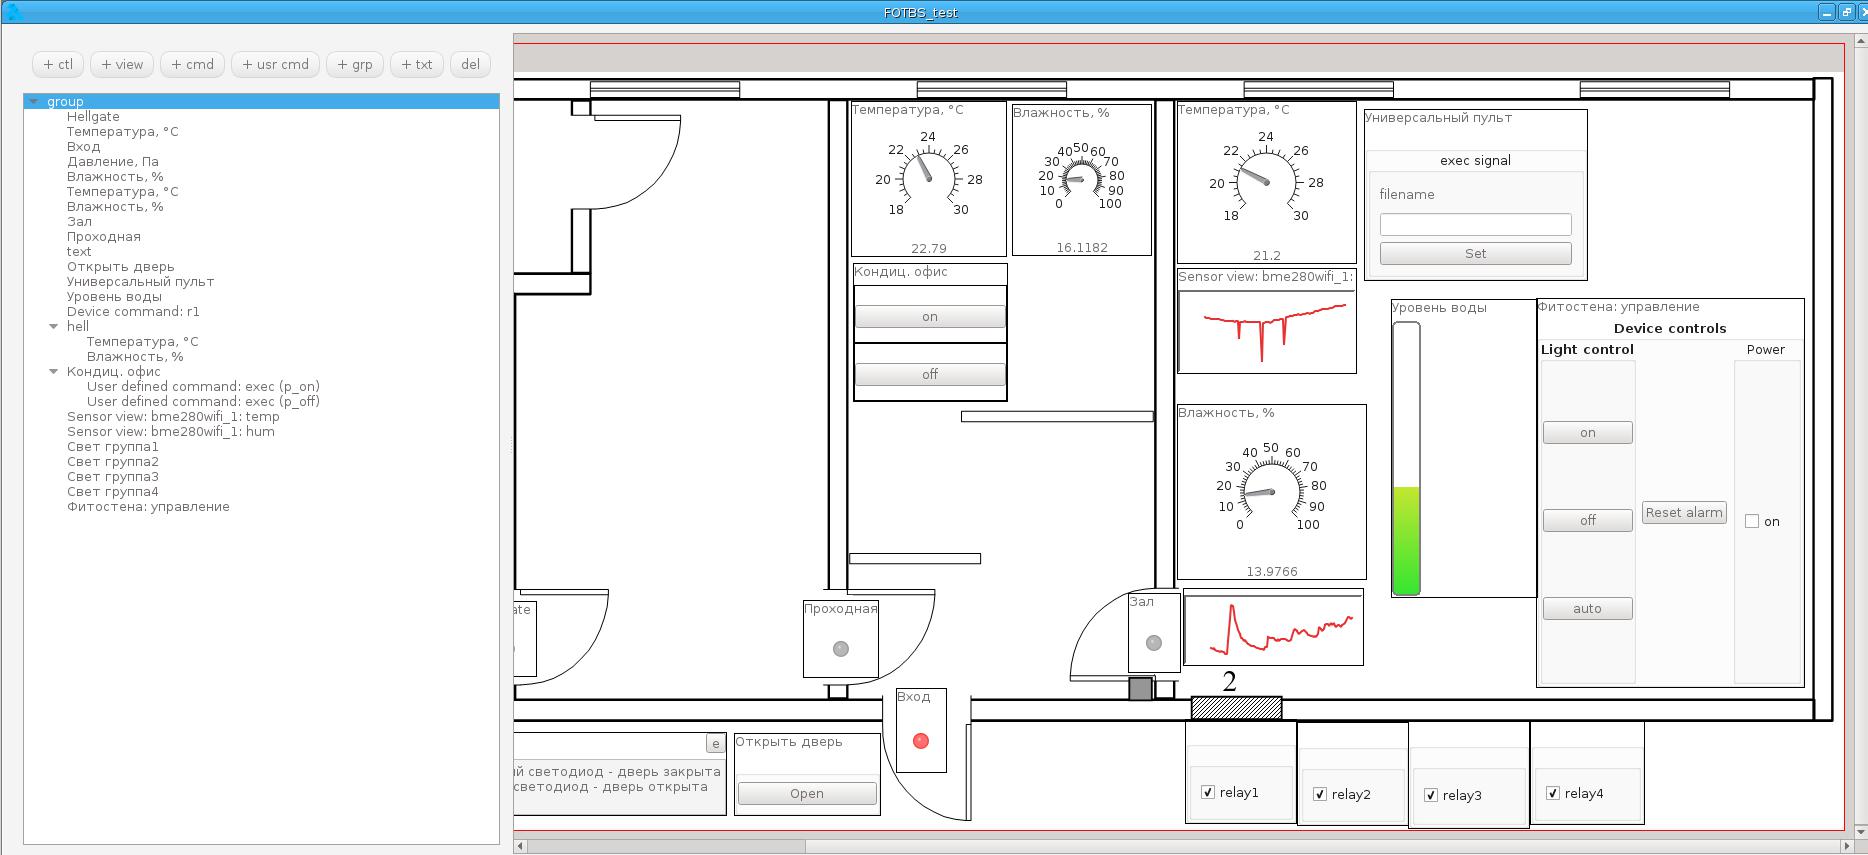
We installed the ECOIMPACT application so as to be able to monitor the goings on in our greenhouse and connected it via the Arps library written by the Research Laboratory of Basic Physics and Technologies of Wireless Communication. ECOIMPACT is a programming environment that offers the creation of panels (picture below), which help to easily monitor parameters and to control the greenhouse.
Connection diagram for Penelope and local server is shown on the following picture:
The idea to connect Penelope to stores and services arose based on current refrigerators and washing machines which are connected to stores, reporting autonomously in regards to their supply and thus scheduling what they need without human interaction.This is the idea behind the mutual symbiosis between the stores and Penelope, which can communicate to the stores that its supply of seed and fertilizer are spent, and thus requisition new supplies. Penelope will also be smart enough to recognise when there was a malfunction and call a service which can repair it.
Connection diagram for connecting Penelope with stores and services is shown in the picture below:
When speaking to the power consumption of one of these greenhouses attention should be paid to what is being grown inside as well as the location. If plants that like light are being grown and the greenhouse is situated in the basement where it is dark, power consumption will be high. If that same greenhouse is places where there is light power consumption will decrease a great deal.
In conclusion the location should be chosen in accordance with the cultures that are to be raised, and vice versa.
The following section shall demonstrate the analysis of consumption of water, power, seed, fertilizer, and substrate on a daily, weekly, and monthly basis, and thus will yield conclusions as to the quality of the greenhouse itself, in accordance with the production analysis.
Currently we see a potential market in the far north where it is cold and where there are no conditions for growing plants, as well as deserts and areas of low quality earth.
Our potential buyers are people who care about their nutrition and want to eat healthy, and seeing as how Penelope looks quite striking, a possible collaboration could be established with interior design.